![Zoom-Share-Screen-Not-Working-[Solved]](https://www.explorateglobal.com/blog/wp-content/uploads/2023/03/Zoom-Share-Screen-Not-Working-Solved.jpg)
You can address the problem with the Zoom sharing screen not working with some helpful fixes. This post offers a number of fixes that can assist you in solving the Zoom screen-sharing issues. To learn more, keep reading.
The Coronavirus pandemic has affected all of us. Everything has changed because of this. Under such challenging circumstances, apps like Zoom helped us maintain our relationships with friends and family and our ability to work. It has improved the convenience of remote work for businesses and the people who work for them. One can use Zoom to stay in touch with their team via video conversations and conferences. The program provides a screen-sharing feature in addition to in-person conversations to aid teamwork on a specific project. Users occasionally get the Zoom share screen not working problem while doing this.
Nowadays, many tech industry giants and experts believe that corporate remote work is the future wave. So, such issues may have an impact on a project’s overall productivity and development. So, it is imperative to address problems like Zoom screen sharing not working as soon as they arise. This content was created after taking this into consideration. This post offers several options to fix the “Zoom share screen not working” problem.
Below are the solutions that you can try to fix the ‘Zoom share screen not working’ problem and ensure seamless productivity.
Method 1: Make Sure The Host Has Enabled Participant Screen Sharing
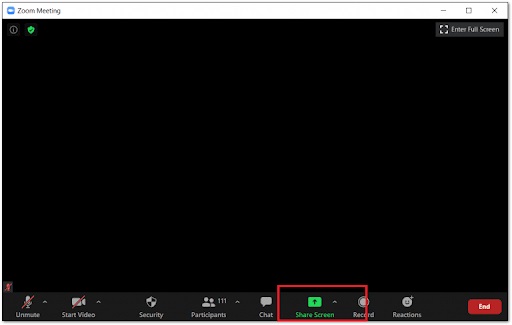
Yes, we know it may sound silly to most of you. But sometimes, the host forgets to enable participant screen sharing, which makes the participants unable to share their screen. To check if this is the problem in your case, click on the Share Screen button.
After doing so, if you see the ‘Host disabled participant screen sharing’ error message, then you have to ask the host to enable the share screen feature for all the participants. You can drop a text notifying the same host using the Chat feature.
If you are the host and don’t know how to enable the share screen feature for all the participants, then below are the steps that you can follow.
If You Are Using Zoom On A Windows or macOS:
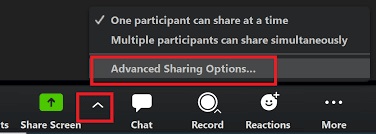
- Click on the arrow-like button available next to the Share Screen feature.
- Now, choose the ‘Advanced Sharing Option’ option.
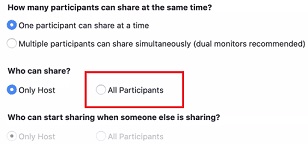
- Look for the ‘Who can Share?’ heading and select All Participants.
If You Are Using Zoom On An Android or iOS Smartphone:
- Tap on the More button available at the bottom-right corner of the application screen.
- Now, enable the Share Screen option under the ‘Allow Participants to’ heading.
Also know: Fix Zoom Microphone Not Working Issue on Windows 10,11,8,7
.
Method 2: Restart Zoom App & Re-Enter The Zoom Room
You can also face the Zoom screen share not working problem due to the temporary app cache. And in that case, the best solution is to restart the Zoom app and re-enter the Zoom room. It is pretty easy to do so on an Android or iOS smartphone. But, if you are using the video conferencing app on your Windows or macOS PC, then you have to follow the below steps.
If You Are Using Zoom On Windows:
If you are using Zoom on Windows PC, then here is how you can fix the Zoom share screen not working problem that you are facing due to a temporary cache.
- First of all, end the meeting or conference call by selecting the End button.
- Go to the systray available on the taskbar.
- Now, right-click on the Zoom icon and click on the Exit option.
- After that, restart the app and re-enter the room again to resume the meeting. Once you have restarted the meeting, try sharing your screen to see if the fix worked or not.
If You Are Using Zoom On Mac:
For Mac users, here are the instructions to fix the Zoom screen sharing not working issue that you are facing due to the temporary cache.
- End the meeting or conference call by selecting the End button.
- Now, go to the Menu bar.
- Select the Zoom icon.
- In the drop-down menu, click on the Quit Zoom option.
- Now, restart Zoom and enter the meeting again. After that, try sharing your screen to see if the problem has got resolved or not.
Method 3: Make Changes To The Zoom Settings
Misconfigured app settings can also be one of the prominent reasons for the Zoom screen share not working problem. Hence, to fix the issue, you must change the Zoom settings. Below we have provided the exact steps that you have to follow.
- First of all, run Zoom on your PC or Mac.
- Then, select the gear icon on the home screen to access the application settings.
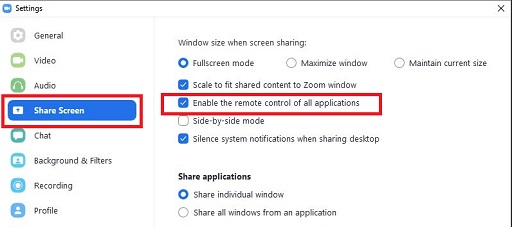
- In settings, click on the Share Screen option in the menu available on the left side of the app screen.
- Now, checkmark the “Enable the remote control of all applications option in the Share Screen settings. “
- Some of you may not be able to do this. In that case, you have to run Zoom as the administrator on your computer.
- After selecting Enable the remote control of all applications option, scroll down to the Advanced tab in Share Screen settings and click on it.
- Now, checkmark Limit your screen share to the frames-per-second option.
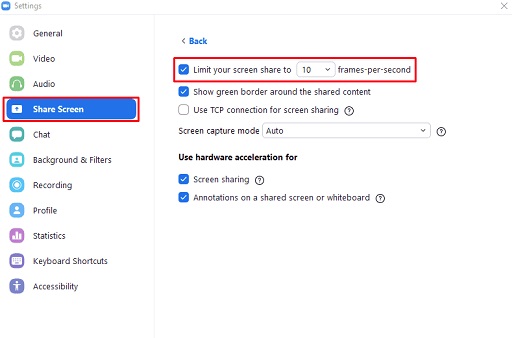
- Select the frames-per-second value below 10.
- Then, close the app.
- Relaunch Zoom and try to share the screen in a video conference to check whether the solution worked.
Method 4: Configure App Permissions
If you have not provided the necessary Zoom permissions, you may face several problems using it. It is one of the major reasons why you are failing to share your screen on Zoom. Hence, you must configure the app permissions. Here is how you can make the required changes to the permissions allowed or required by the Zoom app on your Windows PC or Mac.
Steps For Windows Users:
Here is how you can configure permissions for Zoom on your Windows PC.
- Use the search utility of your Windows 10 PC to search for Privacy Settings.
- Open Privacy Settings from the results.
- Then after that, choose permission under App permissions.
- Now make sure Zoom meetings lie under the Allow Desktop Apps category.
After following the above steps for all the permissions required by Zoom, launch the app. Check if the solution has fixed the Zoom screen sharing not working problem or not.
Steps For Mac Users:
Below are the steps to configure permissions for Zoom on your Mac.
- Go to the Apple logo icon available on the top and click on it to access the Apple Menu.
- In the Apple menu, click on the System Preferences option.
- After that, click on the Security & Privacy button.
- Now, scroll down to the Screen Recording option and click on it.
- Then, you have to click on the lock icon to make changes.
- Enter your admin password if the system asks you to do so.
- At last, checkmark the Zoom app.
Also know: Apps to Remove Background Noise and Audio from Videos
Method 5: Update Graphics Driver
A lot of you might be getting a black screen whenever you try to share the screen or make a video call via Zoom. The most common cause of this problem is your PC’s outdated & corrupted graphics or GPU card driver. Hence, to get rid of the Zoom screen share not working issue due to the black screen, you have to fix the graphics driver.
However, it does not seem to be an easy task to repair drivers for an average PC user. It requires core technical knowledge and much effort to upgrade drivers manually. Considering these things, here we have brought an all-inclusive solution for you. You can effortlessly repair your system’s graphics driver with the help of a robust & advanced driver upgrading tool like Bit Driver Updater. It is a utility that provides its users with authentic driver updates that too with minimal effort. Bit Driver Updater has many other features, making it one of the best driver upgrading programs currently available. Here we have mentioned them below.
- The software boasts a one-click driver update functionality, which saves your time and effort to find, download, & install a suitable driver update.
- You get a robust driver backup feature to create restore points for your current drivers. It helps you to undo unwanted driver changes quite easily.
- Along with this, the software also has a built-in driver backup restoration tool.
- You can even plan and automate your driver scans with the utility. It offers an advanced driver scan scheduler.
- It also allows you to add some of your drivers to the ignore pane.
- The premium version of the software comes with a 60 Day Money-Back Guarantee.
All these features and several other benefits are available in the pro version of Bit Driver Updater. Below we have also provided a quick guide for the software.
- Download Bit Driver Updater pro version by clicking the below button.

- After that, install it by running the software installer on your computer. It is a pretty simple task, and anyone can perform it.
- Then, run the installed Bit Driver Updater program.
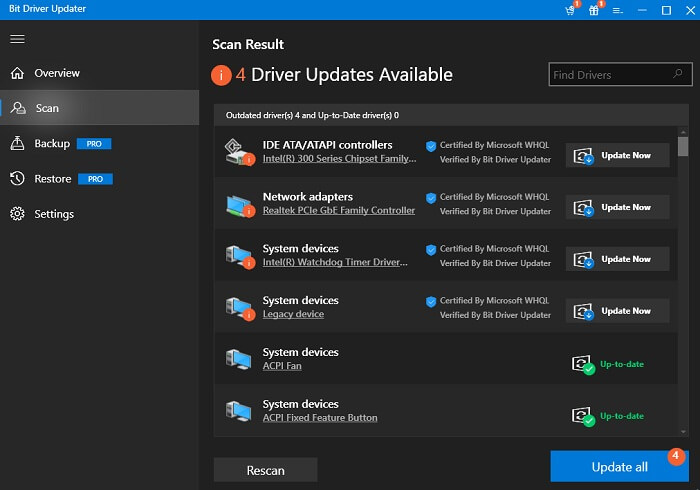
- Click Scan Drivers and wait for a while.
- Once the scan is complete, evaluate the list of detected problematic drivers.
- Click on the Update Now button to fix the outdated & corrupted drivers. You can also repair all of them by selecting the Update All option available at the bottom right corner of the software screen.
That was it for the issue with the Zoom share screen not working. That is one of the most frequent issues experienced by Zoom users. Yet, it is still somewhat irritating. But don’t be worried. You may get rid of it pretty easily by employing the preceding strategies. Please let us know if there is something crucial we have forgotten to cover. You can use the section below the comments section for this.
Subscribe to our blog if you enjoyed reading it, found it informative, and want to learn more about it.
