
The visual processing for your Windows PC is maintained by a graphics card, often known as a video card. It is in charge of how all media work. On a graphics card, there are numerous components for graphic processing that work quickly to render an image.
When your graphics card starts acting up, problems with streaming media and gaming may result. Damaged or absent graphics drivers typically bring on such issues.
What happens when the graphics driver goes corrupt?
A corrupted graphics driver almost exhibits the same symptoms as a corrupted graphics card. This indicates that the problem impacts the system’s entire picture processing. A faulty installation or a virus is frequently to blame for a bad visual card driver.
Artifacts are the most frequent side effect of a faulty visual card driver. They appear as screen spots and have distinct strange forms and colors. It is only junk on the surface. The various textures are also stretched out.
Additionally, your computer could frequently crash, resulting in anything from a straightforward blue screen to a total “lockup” to even sporadic power-offs. Slowdowns and reduced frame rates could potentially be an issue.
And in all such cases, the best solution is to reinstall the Graphics driver and update it with the latest one on your system.
Uninstall the Graphics Driver from the system
To reinstall the new Graphics driver on your computer, you need to uninstall the old one. You can easily complete this task from the Device Manager. It is a reasonably straightforward process.
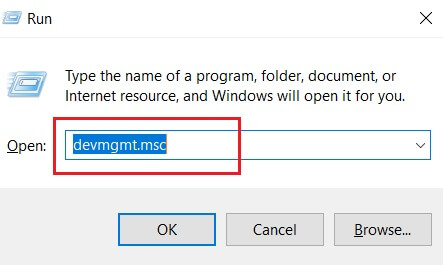
- Open device Manager by either accessing it from the Control Panel or pressing the Windows key and letter R simultaneously to open the Run window. In the appeared dialog box.
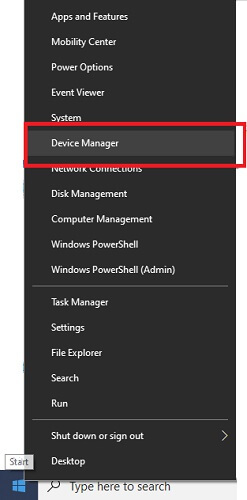
- Type devmgmt.msc and click OK.
- Find Display adapters and double-click on them to view all the video, display, or graphics card devices in the category. If you have several video cards, they will all show up here.

- Select the Uninstall device option from the context menu when you right-click the graphics card entry in Device Manager. Once more, right-click on the video card whose driver you wish to restore if you have several video cards.
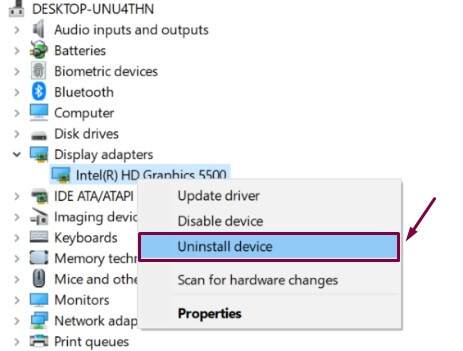
- In the Confirm Uninstall Device dialog box, check the ‘Delete the driver software for this device box, and finally, click on Uninstall.

Also know: How to Solve Display Driver Failed to Start Error on Windows 10
Install a new Graphics driver
You’ve got the option to install a new graphics driver either manually or automatically. You may choose to prefer the way that best suits your skill set.
Method 1: Install the graphics driver via Windows
Now, this solution is quite simple. As soon as you are done with uninstalling the Graphics driver from your system, you need to reboot your computer. This way, Windows will instantly and automatically install the driver on your Windows update without any third-person help.
Although it needs to be mentioned that this method doesn’t always provide the latest and most compatible driver. Hence, it’s better to check out the other methods.
Method 2: Find a new Graphics driver online
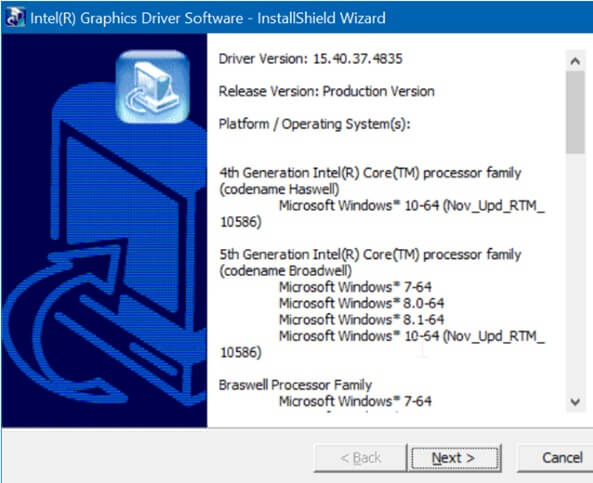
Before you uninstall the Graphics card device, note down its name and model number. After doing so, go to the video card manufacturer’s website, and download the latest version of the driver. If this doesn’t work, then go to the PC manufacturer’s website, and there, download the latest driver version for your PC model.
And if both of these methods pose problems, then simply search for the correct driver by going on the web and typing in the name and model number of the graphics card. Download the driver file.
After uninstalling the device, reboot your computer and then run the downloaded setup file. To finish the installation, adhere to the on-screen directions. Restart your computer to finish.
Also read: Download AMD Graphics Driver
Method 3: Download and install the latest graphics card driver automatically
Since manual fixation is quite lengthy and tiresome. It tests your time, patience, and computer skills. You might even download the wrong drivers, which can further damage your system.
And hence, in that case, we recommend using a utility tool, a driver updater, to be precise, like Bit Driver Updater.

Bit Driver Updater, and other similar tools, automatically recognize your system and start finding the latest drivers that would solve all your system issues. It is extremely proficient in detecting the correct drivers so that you don’t need to search for them online. It updates all the outdated, broken, or missing drivers in one go.

You can instantly scan your system for outdated drivers with the FREE version, while with the PRO version, you can do a lot more, like driver Backup and Restore.
Also know: How to Fix “NVidia Graphics Driver Is Not Compatible With This Version of Windows”
Final Takeaway On How To Reinstall Graphics Driver On Windows 10/11.
You can use these techniques in Windows 10/11 to quickly and effectively reinstall the graphics driver. Despite the fact that each one of them is excellent, we still advise using an automatic driver updater.
