In this blog post, we’ll discuss how to test the microphone on Windows 10 and improve its performance with ease. Continue reading for further information!
With the advancement of technology, online or virtual meetings & conferences have become a crucial part of our daily lives. Have you ever encountered a situation where you’ve to attend an important meeting or just present something on the screen and speak on the microphone, but unfortunately, your microphone abruptly stops working as expected? If yes, then you are not alone. We have recently seen a lot of Windows 10 users complaining about the inappropriate functioning of their microphones. We understand that issue is really annoying. But, luckily, there are numerous effective ways that you can consider in order to get rid of this inconvenience. To help you, we have prepared this guide highlighting methods to test microphone on Windows 10.
Step-by-Step Ways to Test the Microphone on Windows 10
Here are the step-by-step methods for how to test the microphone on Windows 10.
Method 1: Test your Microphone in Windows 10 Audio Settings
You can test the microphone effortlessly from the audio settings of your computer. Below is how to test the microphone on Windows 10 using the audio settings.
Make sure the Microphone is Configured Correctly
First, you need to ensure that the microphone is configured correctly on your computer. It may not be configured if you are using it for the first time. Below is how to configure the microphone.
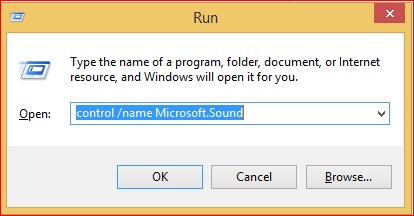
- Press the Windows and R key simultaneously to launch the Run box.
- In the Run box, type “control /name Microsoft.Sound” and click “OK.”
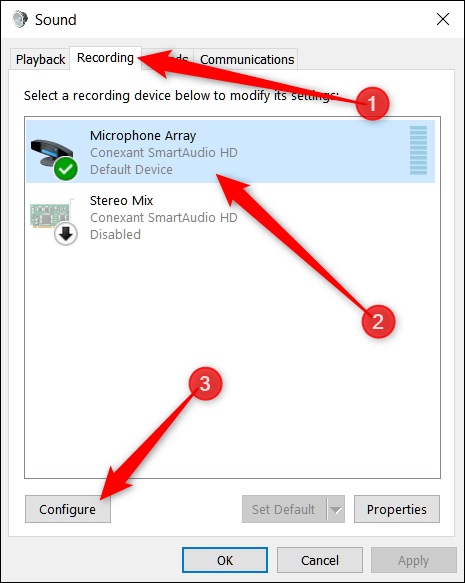
- After the Windows sound settings come up, go to the “Recording” tab and choose the microphone that you want to test on Windows 10.
- Now, click on the “Configure” button and select “OK.”
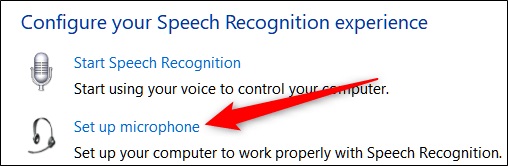
- Next, select the “Set up microphone” option.
- Select the correct microphone type and choose “Next.”
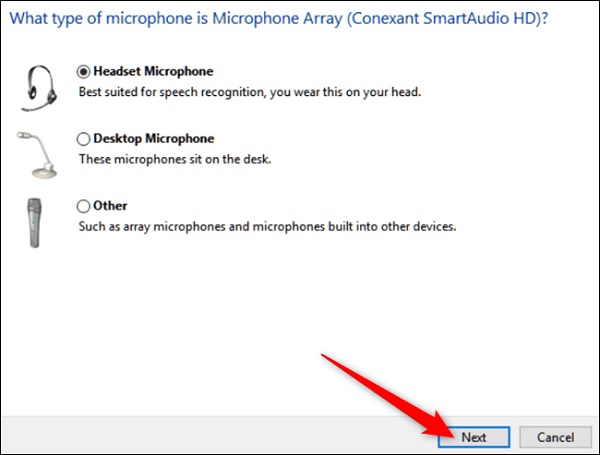
- Be guided by the Microphone Setup Wizard to configure your microphone on Windows 10. Exit the wizard when the process is complete.
Test the Microphone on Windows 10
After configuring the microphone, below is how to test it on Windows 10.
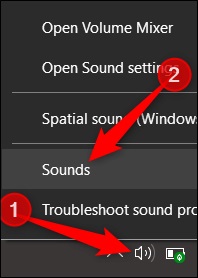
- Right-click on the Speaker icon present on the lower right corner of your screen and choose “Sounds” from the small pop-up menu.
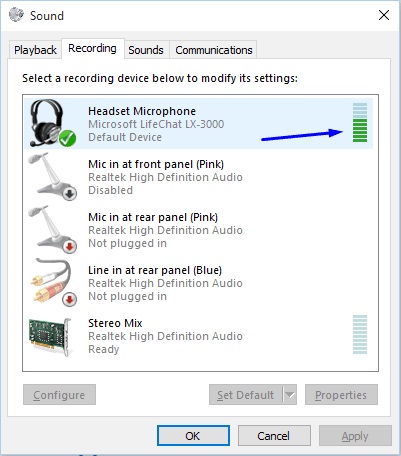
- Move to the “Recording” tab and select the microphone that you wish to test.
- If the selected microphone is not the default device, then click on the “Set Default” button. If the microphone is already your default device, then jump to the next step.
- Speak something into the microphone. If you see green colored bars on the right, then the microphone is working properly.
- After you finish testing your mic on Windows 10, click on the “OK” button.
Also read: Top 14 Audio Recording Software to Record mp3 Music
Method 2: Use the in-built Voice Recorder Application
Windows 10 comes with an in-built voice recorder. Below is how to test your mic on Windows 10 using this application.
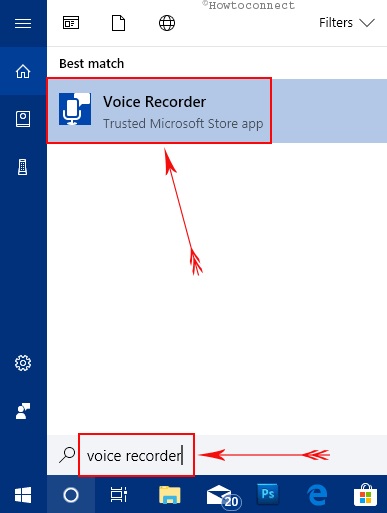
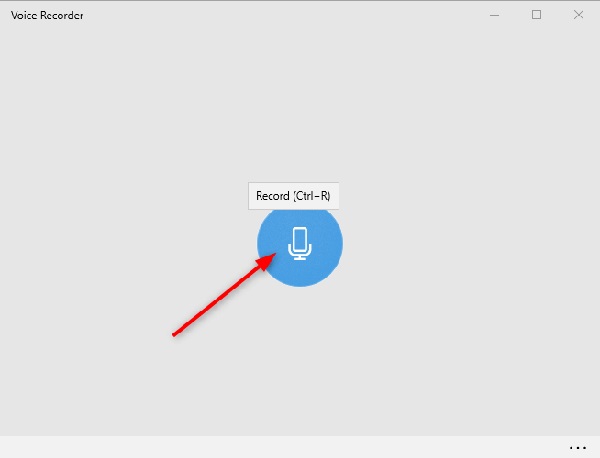
In the search bar of your computer, type “Voice Recorder” and select it from the results.
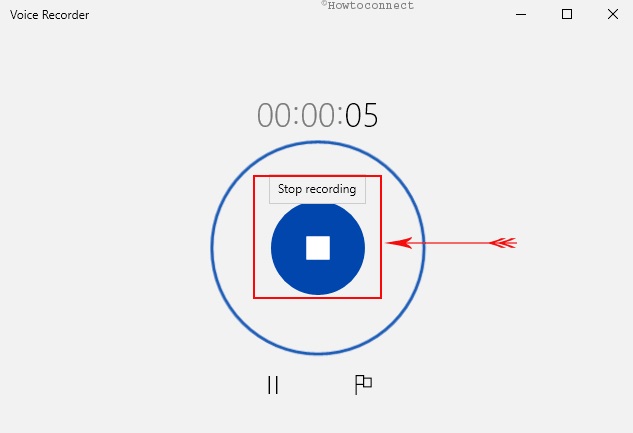
- Click on the “Record Icon” and speak something into the microphone.
- Click on the “Stop” button after you are done recording.
- Click on the recording to play it. If your voice is clear, then it means that the microphone is working correctly.
Now, you must be delighted as your microphone is working perfectly, right? Well, this happiness may not last long if you do not update the sound card driver on your computer. Outdated audio drivers often result in various problems and may even make your microphone dysfunctional. Therefore, after sharing how to test headset microphone in Windows 10 with ease, below we share how to update the sound card driver to keep annoying issues away.
How to Update the Sound Driver so that the Microphone always works Perfectly
You can update the driver for your sound card either through manual ways such as via Device Manager or the official website of the manufacturer, or you can take a shorter and smarter route to update it. In our view, the second option is a better choice. Therefore, we strongly recommend that you update drivers automatically with Bit Driver Updater. This program updates all the device drivers automatically in one mouse click. And it also significantly improves the way your computer performs by making it faster, error-free, and smoother.
Apart from this, another great feature of Bit Driver Updater is that it always downloads and installs only WHQL validated drivers. Now, below we share a few simple steps that you need to take to use this software.
- Using the link given here, download and install Bit Driver Updater.

- Let the software perform the PC scan automatically or run a manual scan by clicking on Scan.
- Wait for two to three seconds till the scan finishes.
- Go through the scan results and click on the Update Now button that you see alongside the sound card driver.

You can also update all the drivers in a single click, create and restore driver backups, increase the driver download speed, and exclude the drivers that you do not want to be scanned by clicking on “Update All.”
Yes, it is this easy to update the sound card driver with Bit Driver Updater and ensure that the microphone delivers the best performance. Hence, click on the link shared below to get this software.
To resolve various microphone issues, you can also visit this dedicated guide on our blog.
Bonus Tips: How to Improve the Microphone Quality on Windows
If your microphone is working fine but you want to enhance its quality even more, then here’re some bonus microphone quality tips for you.
- Increase the mic level by following the path Sound Settings>Sound Control Panel>Recording>Double-click default mic>Levels>Move the slider to the right side.
- Use a good equalizer app to boost the microphone quality.
- Disable the unnecessary audio enhancements by following the path Sound Settings>Sound Control Panel>Recording>Double-click default mic>Enhancements>Disable all sound effects.
- Enable the Far Field Pickup (FFP) enhancement.
- Stop the third-party applications from taking control of the microphone.
- Change the bitrate of your microphone to DVD quality.
How to Test Microphone on Windows 10: Explained
So, these are different ways to test the microphone on Windows 10. No matter which approach you choose for the task, just be sure your microphone is properly set up and firmly connected to your PC.
We hope the information shared in this article will help you. If you still have any questions or doubts, then do tell us immediately in the comments section below.
For more technical information, follow us on our Social Media channels: Facebook, Twitter, Pinterest, & Instagram.
