

Have you encountered the Windows 11 Critical Process Died or BSOD error and are unsure of how to proceed? After receiving the Windows 11 Critical Process Died error, are you unable to boot up the computer? Did the PC boot up, but you’re unsure what happened? This article will provide answers to all of your questions!
The Blue Screen of Death (BSOD), stop, or bug check errors all indicate a serious problem on your Windows 11 PC. The blue screen displays various error codes, one of which is Critical Process Died. In order to prevent future occurrences, you must look into the issue and troubleshoot if the computer restarts to the Windows Home Screen on its own. Because of this error, you may be unable to access the Windows 11 desktop the next time.
In some severe situations, Windows 11 users cannot go to the desktop. Keep reading to learn how to save your data on a Windows 11 PC by using the Critical Process Died, or BSOD, troubleshooting techniques listed below. You can use the steps on a Windows 10 computer too.
How to Solve Critical Process Died Windows 11 Error
The “Critical Process Died” error typically occurs on Windows 11 when a critical system process encounters a problem and causes the system to crash. In this article, we will discuss different methods to solve the Critical Process Died Windows 11 error. So let’s find out.
Method 1: Update Windows
One of the common causes of the Critical Process Died error is outdated or incompatible system drivers. To resolve this, it’s essential to update Windows regularly. Here’s how you can do it:
- Press the Windows key + I to open the Settings app.
- Select “Windows Update” from the sidebar.
- Click on “Check for Updates” and let Windows search for the latest updates.
- If any updates are available, click on “Download” and “Install” to update your system.
- Restart your computer after the updates are installed.
Method 2: Run System File Checker (SFC) Scan
The System File Checker (SFC) is a built-in Windows utility that scans and repairs corrupted system files. Running an SFC scan can help fix the Critical Process Died error. Here are the steps to follow:
- Press the Windows key + X and select “Command Prompt (Admin)” or “Windows PowerShell (Admin)” from the menu.
- In the command prompt window, type “sfc /scannow” (without quotes) and press Enter.
- Wait for the scan to complete. If any corrupted files are detected, the SFC will replace them automatically.
- Restart your computer after the process is finished.
Method 3: Update Device Drivers
Outdated or incompatible device drivers can often be the cause of the Critical Process Died error. To update your device drivers, follow these steps:
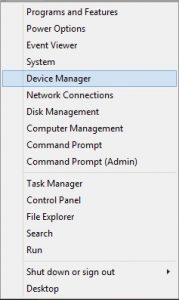
- Press the Windows key + X and select “Device Manager.”
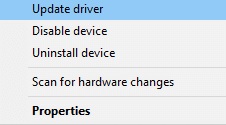
- Expand the categories and right-click on the device driver you want to update.
- Select “Update driver.”
- Choose whether you want to search for drivers automatically or browse your computer for updated drivers.

- Follow the on-screen instructions to complete the driver update.
- Repeat these steps for all the devices that need updating.
- Restart your computer and check if the error is resolved.
You can also use the Win Riser Driver Updater tool to update the drivers on your computer. To do so, follow the steps below:
- Download and install Win Riser Driver Updater by clicking on the link provided below.

- Launch the application by double-clicking on its shortcut icon.
- Once the application opens, it will automatically start scanning for outdated or missing drivers on your system.
- Wait for the scan to complete. This may take a few minutes, depending on the number of drivers on your system.
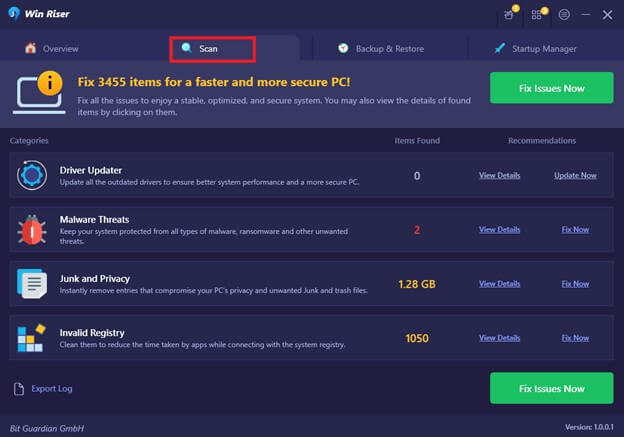
- After the scan is finished, the application will display a list of outdated drivers that need to be updated.
- Click on the “Update All” button to update all the drivers at once. Alternatively, you can individually select the drivers that you want to update and click on the “Update” button next to each driver.

- Win Riser Driver Updater will start downloading the latest driver versions from the internet. Make sure you have a stable internet connection for this process.
- Once the driver downloads are complete, the application will begin installing the updated drivers automatically. During the installation, you may be prompted to restart your computer. If prompted, follow the on-screen instructions to restart your system.
- After the restart, the updated drivers will be installed on your system, and you should experience improved performance and compatibility.
Note: Win Riser Driver Updater is paid software, so you may need to purchase a license to unlock its full functionality. Make sure to back up your important files and create a system restore point before updating drivers, as some updates may cause compatibility issues.
Method 4: Check for Memory Issues
Faulty or incompatible RAM modules can also cause the Critical Process Died error. To check for memory issues, you can use the Windows Memory Diagnostic tool. Here’s how you can do it:
- Press the Windows key + R to open the Run dialog box.
- Type “mdsched.exe” (without quotes) and press Enter.
- Select “Restart now and check for problems.”
- Windows will restart, and the Windows Memory Diagnostic tool will run a series of tests on your RAM modules.
- If any issues are detected, consider replacing the faulty RAM module.
Method 5: Scan for Malware
Malware infections can interfere with critical system processes and lead to errors like the Critical Process Died. It’s crucial to run a full system scan using a reliable antivirus program. Here’s how you can do it:
- Open your preferred antivirus software or use Windows Defender by clicking on the shield icon in the taskbar.
- Select “Full Scan” or “Custom Scan” to scan your entire system.
- Wait for the scan to complete, and if any threats are detected, follow the instructions to remove them.
- Restart your computer after the scan and removal process is finished.
Method 6: Perform a Clean Boot
If none of the above methods work, performing a clean boot can help identify the cause of the Critical Process Died error. Here are the steps to perform a clean boot:
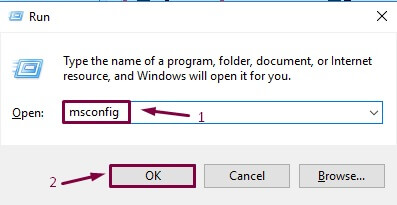
- Press the Windows key + R to open the Run dialog box.
- Type “msconfig” (without quotes) and press Enter.
- In the System Configuration window, go to the “Services” tab.
- Check the box that says “Hide all Microsoft services.”
- Click on “Disable all” to disable all non-Microsoft services.
- Go to the “Startup” tab and click on “Open Task Manager.”
- In Task Manager, disable all startup programs by selecting them and clicking on “Disable.”
- Close Task Manager and go back to the System Configuration window.
- Click on “Apply” and “OK” to save the changes.
- Restart your computer.
By performing a clean boot, you can identify the problematic software or service causing the Critical Process Died error. Once identified, you can take appropriate action, such as uninstalling or updating the software or contacting the software’s manufacturer for support.
Critical Process Died Windows 11 Error: Fixed
The Critical Process Died Windows 11 error can be a frustrating issue to deal with, but there are several potential solutions that you can try. If these steps do not resolve the error, it may be necessary to perform a system restore or reinstall Windows 11. It’s important to remember that each computer and situation is unique, so you may need to try multiple solutions until you find the one that works for you.
It’s also worth noting that seeking assistance from a professional may be beneficial if you are unsure or uncomfortable performing these troubleshooting steps yourself. With patience and persistence, you’ll be able to overcome the Critical Process Died Windows 11 error and ensure a smoother experience with your operating system.