
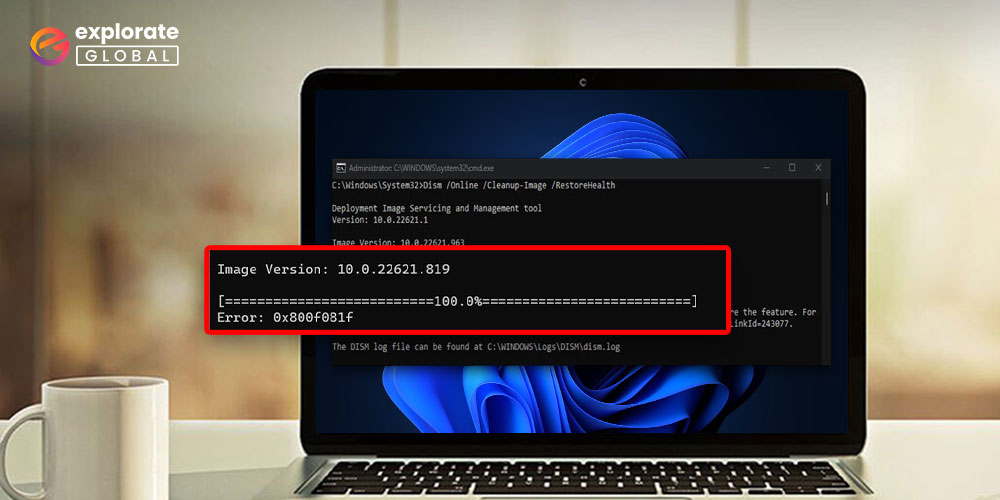
Every Windows error can be fixed with a few fundamental techniques. The DISM command is just one of them. But what if the DSIM command itself encounters a problem? The DISM command is susceptible to different issues just like Windows Update, Device Driver, and any other component of the Windows operating system. Users most frequently see the DISM 0x800f081f error in Windows 10 out of those.
The DISM source files could not be found, according to the error message that appears when you run a DISM command on the Command Prompt. Please be calm if you are also experiencing issues 0x800f081f on your Windows 10 computer. The solution to this problem is not that difficult. Simply read this manual and the simple directions we have provided. Without further ado, let’s get started on some practical ways to resolve the DISM error 0x800f081f.
Methods to Resolve DISM 0x800f081f Error in Windows 10
Here we have provided some of the most effective and convincing solutions for the DISM 0x800f081f Error in Windows 10.
Try Using DSIM Cleanup Command
The first and easiest thing that you can do to resolve error code 0x800f081f is to try using the DISM Cleanup command in the Command Prompt. Follow the below steps to run the DISM Cleanup command and fix the DISM error 0x800f081f successfully.
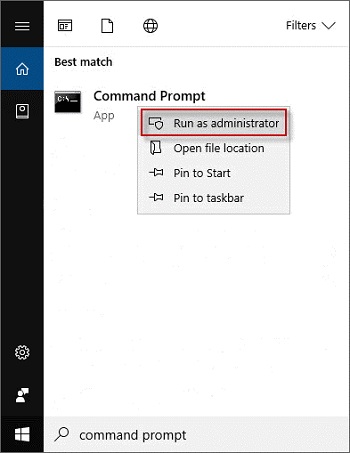
- Run the Command Prompt as administrator. If you are not aware of the Windows shortcut keys, then you can also use the Windows search tool to open the Command Prompt as administrator.
- Enter the following command to the Command Prompt.
sfc /scannow
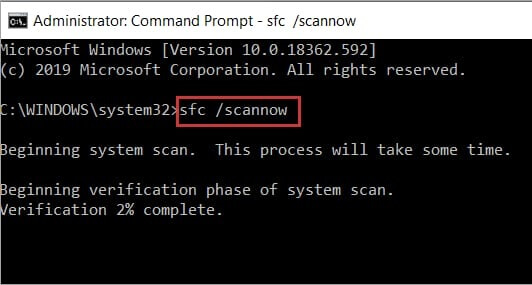
- Press Enter on the keyboard.
- After performing the above command successfully, provide the following command and press Enter.
DISM.exe /Online /Cleanup-image /Restorehealth - Now check if the 0x800f081f Windows 10 error still persists.
Congratulations if you have resolved the issue with the above method. However, if it persists, then you may follow the next method to fix DISM 0x800f081f Error in Windows 10.
Also know: How to Solve Display Driver Failed to Start Error on Windows 10
Edit Group Policy
This solution is only for the users of Windows 10 Enterprise, Pro, and Education versions. They can fix the 0x800f081f DISM error by configuring their group policy. However, if you have any other version of the Windows 10 operating system, then you can avoid this method. Here are the instructions to configure the group policy.
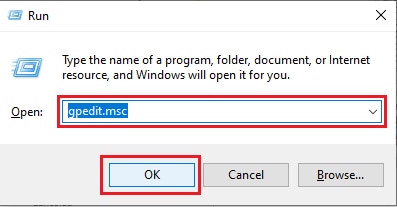
- Open the Run dialog box. You can do it by using the shortcut keys, i.e., Windows Key and R.
- In the text box, enter ‘gpedit.msc’ and then press the Enter key.
- In the Local Group Policy Editor’s left section, click Computer Configuration.
- Then select Administrative Templates.
- After that, look for the System and click on it.
- Find ‘Specify settings for optional component installation and component repair’ on the right section of Local Group Policy Editor and double-click on it.
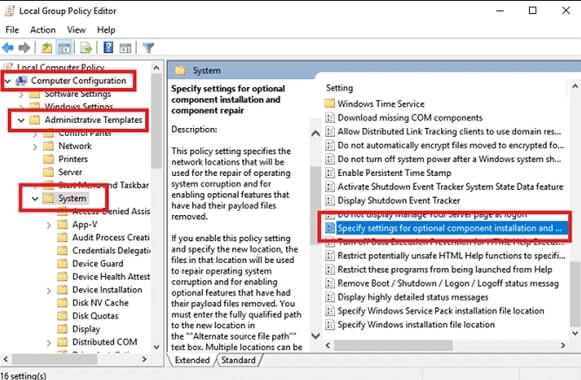
- Mark Enabled.
- Select OK.
Get Source Files From Windows Image
The main reason for the DISM 0x800f081f Error in Windows 10 is the inability of Windows to get the source files. Hence, if none of those mentioned above solutions work, then you need to change the DISM source.
You have to create an image of your Windows to do this. The best thing that you require is the Media Creation Tool.
After having the Media Creation Tool, follow these steps to create an image for the Windows and then change the DISM source.
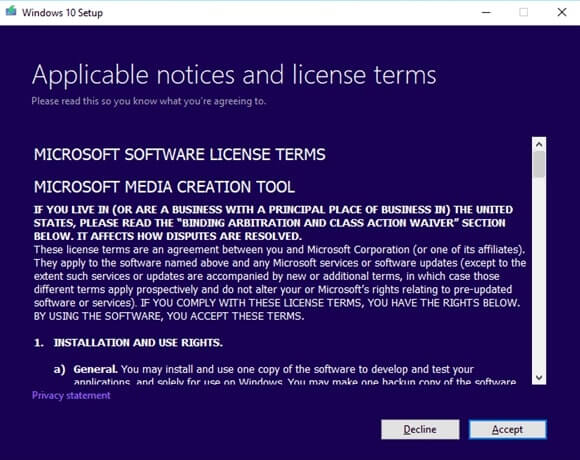
- Launch the Media Creation Tool.
- Agree to the license terms.
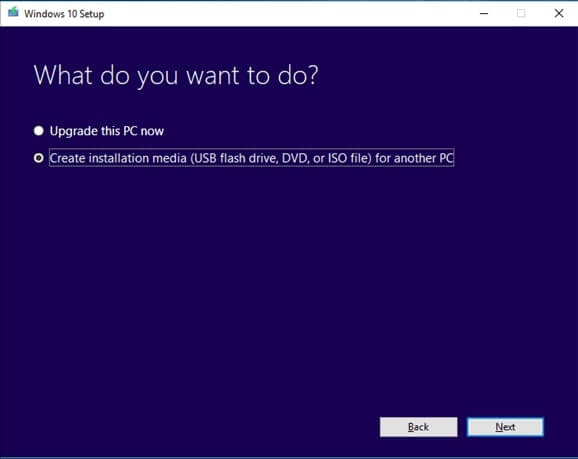
- Mark the Create installation media (USB flash drive, DVD, or ISO file) for another PC option.
- Select the Next button.
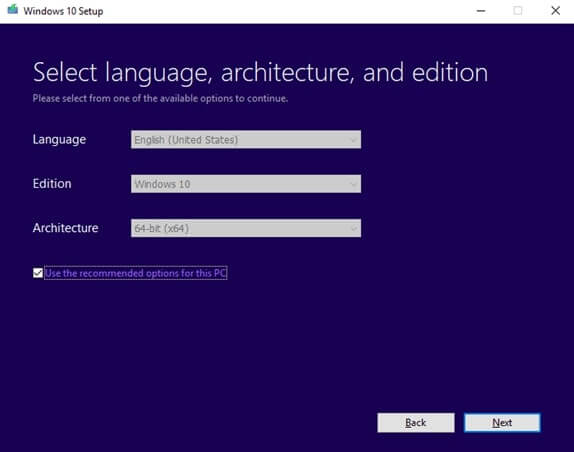
- Deselect ‘Use the recommended options for his PC’ and select the language, architecture, and edition as per your preference.
- Click Next.
- Now choose the ISO file option and click Next.
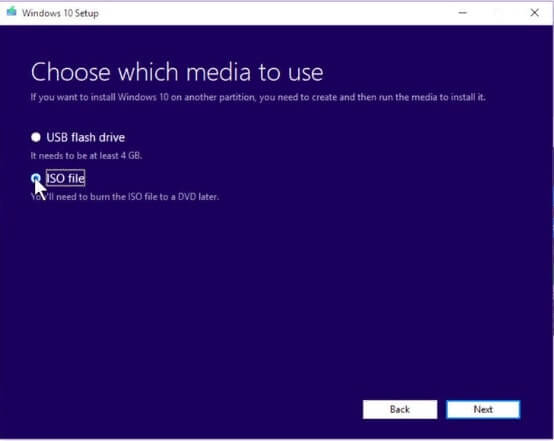
- Set the location and then save the ISO file.
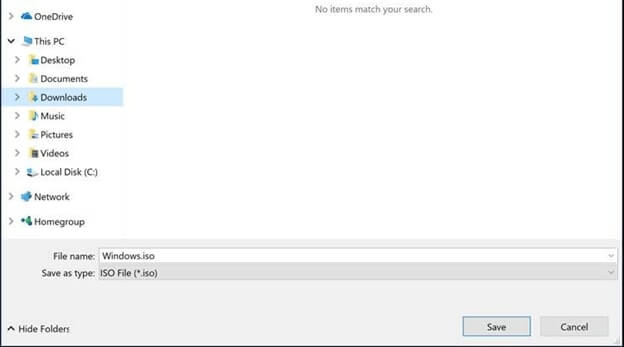
- Let the download complete.
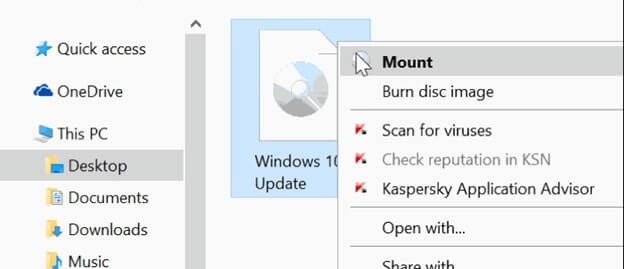
- After that, do right-click on the Windows ISO file.
- Select Mount from the context menu.
- Now you’ll see various options in the mounted ISO file Window. Select install.esd and right-click on it. Then click on Copy.
- Paste it to the Driver C:.
- Run Command Prompt.
- Input cd\ in the Command Prompt and press Enter. It will take you to the Drive C: root folder.
- After that, enter the following command and press the Enter key.
dism /Get-WimInfo /WimFile:install.esd - It will show you various Windows versions along with the index numbers. You have to select and enter the index number of your particular Windows version.
- Then, enter the following and press the Enter key.
dism /export-image /SourceImageFile:install.esd /SourceIndex:IndexNumber /DestinationImageFile:install.wim /Compress:max /CheckIntegrity
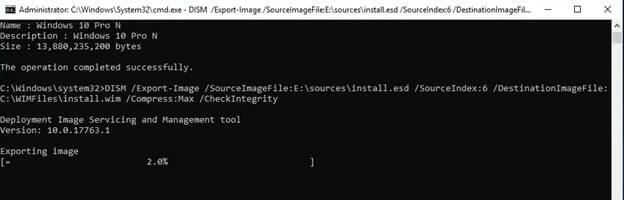
NOTE: Make sure to replace the ‘IndexNumber’ in the above command with the respective Index number of your Windows operating system. - Let it complete.
- Go to Drive C: you’ll see the install.wim file.
- Run the Command Prompt as administrator again.
- Give the following commands respectively and hit the Enter key after each one of them.
DISM /Online /Cleanup-Image /StartComponentCleanup
DISM /Online /Cleanup-Image /AnalyzeComponentStore - After this, provide the following command along with the new source file.
DISM /Online /Cleanup-Image /RestoreHealth /Source:WIM:c:\install.wim:1 /LimitAccess - Now, in the end, provide the system file checker command, i.e., sfc /scannow.
That’s all. We know that this is quite a long method, but trust us, it is one of the most effective solutions for the error 0x800f081f in Windows 10.
Also know: Fix HTML5 Video Not Properly Encoded Error in Your Browser
Fixed: DISM 0x800f081f Error
Thus, these are the ways you can use to resolve the DISM 0x800f081f error in Windows 10. Indeed, the last one is quite tiresome, long, and boring. Yet, it is also the most beneficial. While using the Deployment Image Servicing and Maintenance commands, these techniques can assist you in locating the source files.
But if you have any better ideas, please share them in the comments. And if you think this article was useful, please subscribe to our blog.