
Don’t worry if your computer or laptop’s HDMI port not working on Windows 10. Using the solutions described in this article, you may easily fix this issue.
Your computer’s HDMI connections increase its capabilities and make it simpler for you to connect to a variety of devices. However, many users have claimed that after updating to Windows 10, the HDMI ports are not working.
Read this article carefully if you’re experiencing the same thing. Here, we introduce you to the most effective fixes for this annoying issue.
But first, let’s talk about why the device attached to the computer’s HDMI connection isn’t producing any sound or images.
It is easier to solve a problem when you are aware of its root causes. So, we’ve included them below.
Why are HDMI ports not working on Windows 10?
Here is the answer to your question, i.e., “Why my HDMI port is not working.”
- Incorrect display settings
- Outdated graphics driver
- Issues with the HDMI cable connection
- Hardware problems
Above were the core reasons why HDMI ports are not working on Windows 10 PC/laptop. Now, let’s fix this problem.
Fixes for HDMI Ports not Working on Windows 10
Below is how to fix the issues if the HDMI port is not showing in Device Manager or has completely stopped working.
Fix 1: Reconnect the HDMI Cables
In many cases, the HDMI cables are not properly connected. And, this becomes the reason why HDMI ports are not working on your PC or laptop. Follow these steps to reconnect the HDMI cables to fix the issue.
- Detach every HDMI cable from the ports.
- Shut down each of your devices and unplug their power cable/battery.
- After five minutes, replug the power cable/battery.
- Reconnect the HDMI cables and turn on the devices.
Fix 2: Perform Hardware Troubleshooting
Certain hardware issues also affect the working of your computer’s HDMI ports. Thus, run the hardware troubleshooter if the HDMI ports are not working properly. Below are the step-by-step directions to do it.
- Using the combination of keys Windows and I bring up the Settings menu.
- Choose Update and Security.
- Select Troubleshoot from the left pane of the screen.
- Click on Hardware and Devices.
- Click on Run the troubleshooter to begin the troubleshooting process.
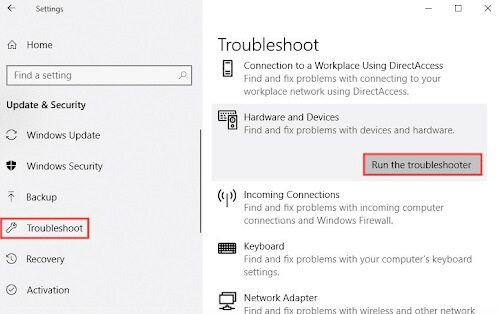
- Let the troubleshooting complete.
- Check whether the HDMI ports are working or not.
Also know: Download SanDisk USB Driver on Windows
Fix 3: Check the Display Settings
Users who have multiple monitor setups face issues with the HDMI ports mainly due to incorrect display settings. Thus, if you also use more than one monitor, follow these steps to check and correct the display settings.
- Use the shortcut command Windows+P to view the available display modes.
You get the following display modes on your screen.
- PC Screen Only: Only for the first monitor
- Duplicate: Duplicates the screen content on both monitors
- Extend the Use of both monitors to show an extended desktop
- Second screen only: Use only the second monitor
- Play with each mode and choose the one that fits your needs and solves your problem.
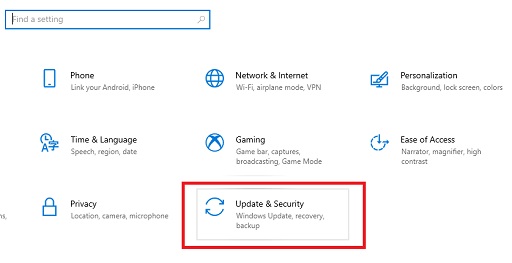
Fix 4: Update your Operating System
Windows updates fix many issues including the one with your HDMI ports. Therefore, update Windows if the HDMI ports are not working on Windows 10. Here is how to do it.
- Employ the keypad shortcut Windows+I to launch Settings.
- Pick the Update & Security option.
- Check for updates.
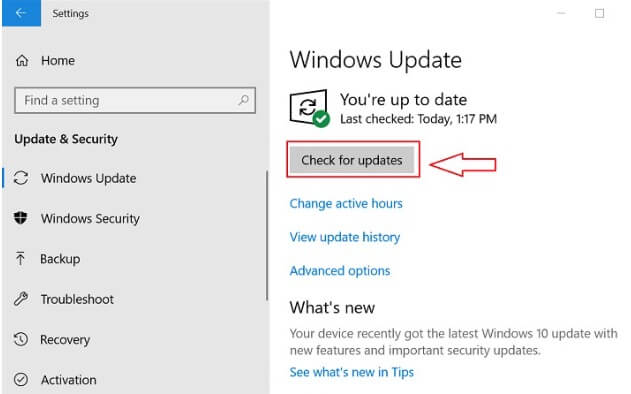
- Download the available update and install it on your computer.
- After performing the above steps, give your computer a restart.
Fix 5: Update the Graphics Driver
Outdated drivers cause not just one but many computer problems. If the HDMI port is not working on Windows 10 PC or laptop, you must consider updating the graphics driver.
You can update the display driver and all other problematic drivers effortlessly with software like Bit Driver Updater. This program requires just a click to get all the drivers updated.
Moreover, it also offers many stunning features, such as driver backup and restores, driver download speed acceleration, etc. We have done a complete review of this software. You can check it out to know more about the features and benefits of Bit Driver Updater.
Below is the way to update the graphics driver using Bit Driver Updater.
- Click on the download button below to get the setup of Bit Driver Updater downloaded.

- Double-click on the downloaded setup and complete the software installation.
- Let the PC scan complete. Bit Driver Updater takes only a few seconds to scan your computer.
- Review all the flagged drivers and click on the Update All button to get them updated automatically.

You can also update the graphics driver individually. All you need to do is click on the Update Now button present next to it.
Also know: USB Data Blocker Software for Windows
HDMI Ports not Working: Solved
In this article, we covered a variety of fixes for causing HDMI ports not working issue. Starting with the top fix, you can work your way down until you find the one that works best for you.
If you don’t have much time, you can update the drivers with Bit Driver Updater to permanently fix the problem. Please let us know in the comments area if you have any suggestions for more effective solutions.
Continue reading and follow our site to learn additional fixes for irritating computer issues.