

Today’s most frequently asked question from users, “How to fix the keypad not working issue on my laptop,” is addressed in this post.
What will occur if a computer doesn’t have any attached keyboards? Well, if that ever occurs, the situation will undoubtedly be difficult. You won’t be able to write in the necessary data, connect with your colleagues, or use shortcut commands to access different settings quickly. Although some computers have virtual or on-screen keyboards, actual keyboards cannot be substituted for them. They are far more user-friendly and comfortable, which is the reason. Unfortunately, the laptop keyboard is not working for some customers.
If you are one of them and you came to our page looking for “What to do if my laptop keypad is not working?” then you should read this typewritten article. Here, we discuss the issues with the solutions. These adjustments can be made without a lot of laborious work. Let’s start looking into the problem now.
Note: In case you are not able to type with your keyboard, then enable the on-screen keyboard. Here are the directions for the same.
- Press Windows and I key at once to trigger Settings.
- Choose Ease of Access.
- Select “Interaction” from the left pane.
- Click on “Keyboard.”
- Turn on the “Use on-screen keyboard” toggle.
Now that you have turned on the virtual keyboard, here’s how to fix the problems with your physical keyboard.
Methods to Fix Keypad not Working on Windows 10
Your laptop keyboard is not working for reasons such as missing or outdated drivers, filter key bugs, incorrect configuration of the keyboard, and more. However, you do not need to worry as the below fixes solve all the problems in no time.
Fix 1: Turn the Filter Keys Off
The filter key bugs cause the keypad not working problem on Windows 10. Therefore, to fix the issues you are facing with your keyboard, turn off the filter keys by using the below directions.
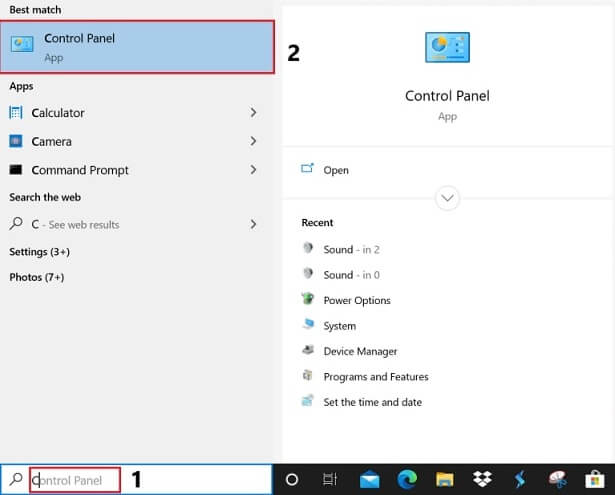
- In the box located next to the Start icon, type “Control Panel” and click on the top result.
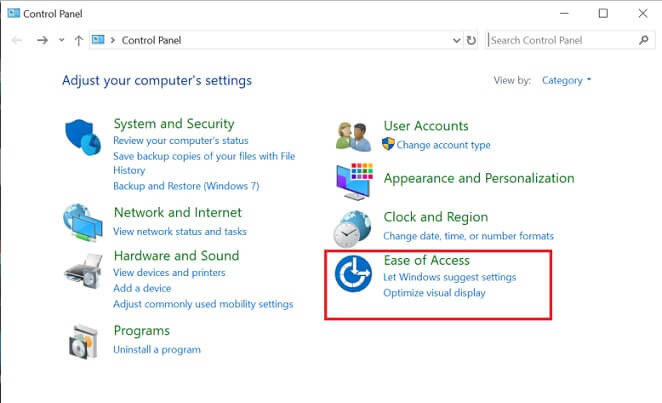
- After Control Panel gets triggered, click “Ease of Access.”
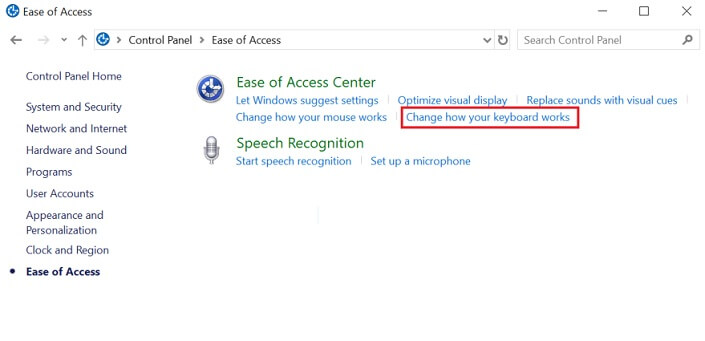
- Click on the option “Change how your keyboard works”.
- Uncheck the “Turn on filter keys” box.
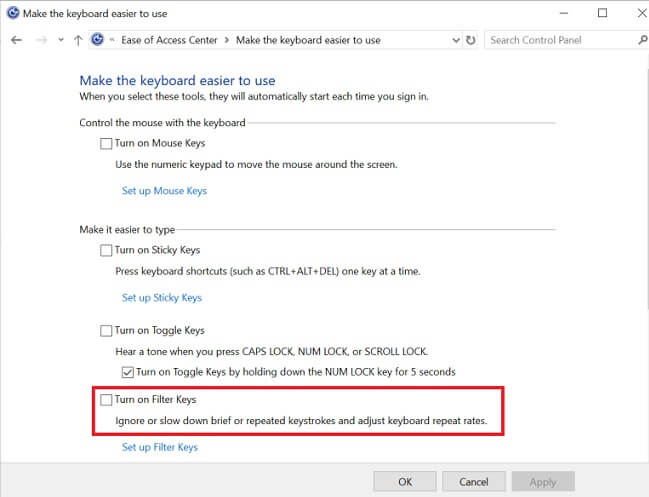
- Click “Apply” and “OK” and check whether the laptop keyboard is working or not.
Method 2: Change the Power Management Settings
If the above fix has not answered your question, i.e., “How to fix the problems if my keypad is not working?” then here’s another fix that you can try. Follow the below instructions to change the Power Management settings and unmark the “Allow the computer to turn off this device to save power” function.
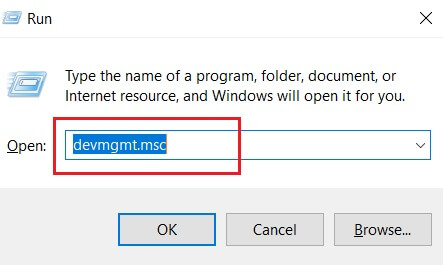
- Press Windows and R keys at once to set the Run box in motion.
- In that box, type “devmgmt.msc” and click the “OK” option.
- Elaborate on the section of “Universal Serial Bus Controllers” and double-click on USB where the keyboard got connected (in most cases, it is Generic USB Hub or USB Root Hub).
- After its Properties get displayed, switch to the tab “Power Management.”
- Unmark “Allow the computer to turn off this device to save power” and select “OK.”
- Restart the laptop and check whether the keypad not working issue is gone or it is still there to trouble you.
Also know: Top Android Keyboard Apps
Fix 3: Using the Windows Troubleshooter
In case your laptop keypad has stopped working, then try using the Windows troubleshooter to fix it. Follow the directions explained below to do it.
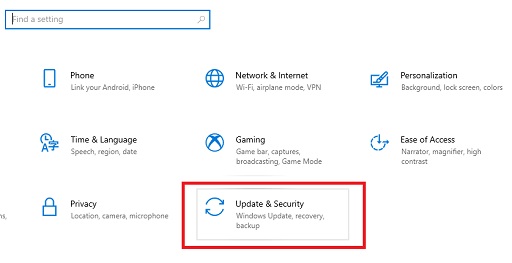
- Press the Windows and I key at once (you can do so via the on-screen keyboard) to call up Settings.
- After the Settings appear, click “Update & Security.”
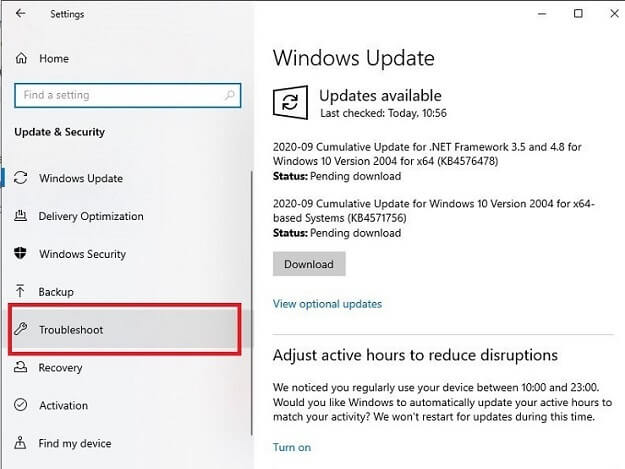
- Select “Troubleshoot” from the options present on the left side of the screen.
- Select “Keyboard” from the available options.
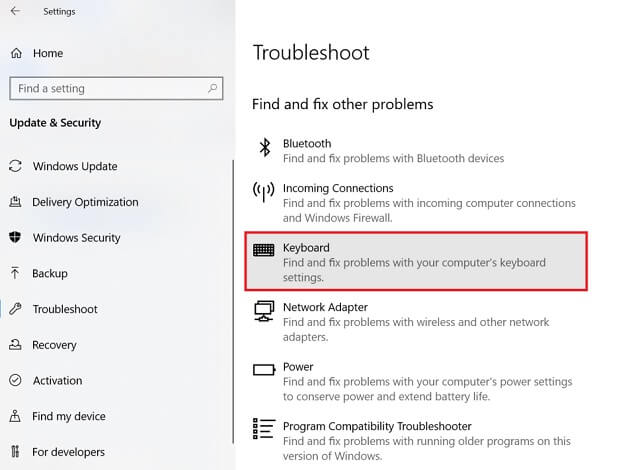
- Click “Run the troubleshooter.”
- After the troubleshooting process ends, restart the computer and check whether the keyboard has started working again or not.
Fix 4: Turn off the Fast Startup
The fast startup often messes up the functioning of the computer and leads to the keyboard not typing, and other device issues. Thus, implement this procedure to disable the fast startup.
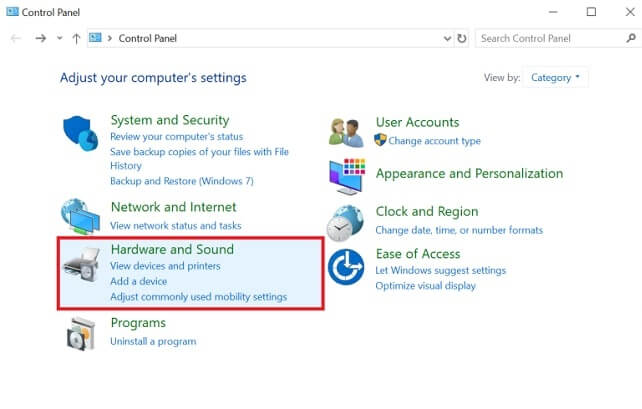
- Initiate the Control Panel.
- After it is triggered, choose “Hardware and Sound.”
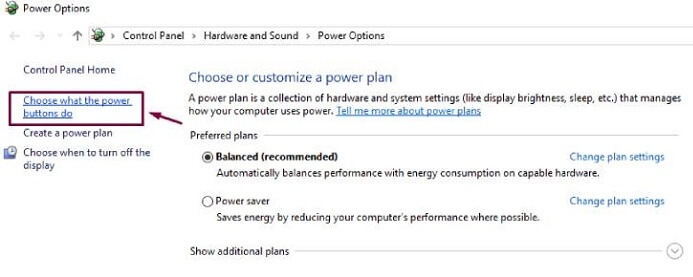
- Choose “Power Options” from the menu on your screen.
- Select “Choose what the power button does.”
- Click “Change settings that are currently unavailable.”

- Uncheck the option “Turn on fast startup (recommended)” and choose “Save changes.”
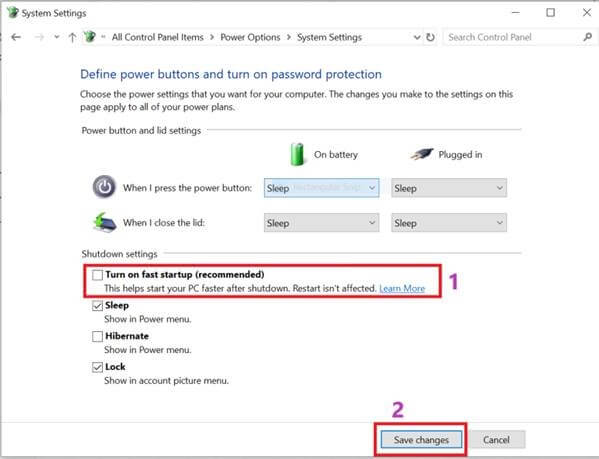
- Restart the computer and check whether the keyboard is working correctly or not.
Fix 5: Install the Keyboard Driver Again
Sometimes, reinstalling thekeyboard driverhelps to fix issues like the numeric keypad not working. Therefore, try installing the driver again by implementing the instructions shared here.
- Trigger the Windows 10 driver management tool, i.e., “Device Manager.”
- Expand the segment of “Keyboards” and right-click the keyboard that has stopped working.
- Select “Uninstall device” from the small popup menu.
- Give your final ascent for the uninstallation and checkmark ” Delete the driver software for this device.”
- After the driver is uninstalled, reinstall it from the website of the manufacturer.
Fix 6: Check the USB Port
It may be possible that the USB port is incompatible or damaged. Therefore, if your laptop keyboard is not working, then try connecting the keyboard to another port and check whether it works or not.
Related: Solve USB C Port Not Working Issues in Windows
Fix 7: Update the Keyboard Driver
Now comes the magical solution for all the computer issues that you are struggling with. Outdated drivers are the major problem-causing factors. Therefore, updating the driver resolves all the problems. Hence, update the keyboard driver to fix the problems if the keypad is not working on Windows 10. There are both manual and automatic ways to do it. But, we do not recommend the manual methods as they are as tough to implement and risky for the well-being of your computer. We strongly recommend updating the driver through Bit Driver Updater. This top driver updater updates all the drivers in a single click and optimizes the device’s performance as well. Below is the quick process to update drivers with Bit Driver Updater.
- Click on this link to download Bit Driver Updater and install it.

- After installation, let it scan the PC automatically, or if you wish, then click “Scan” to perform the scan manually.
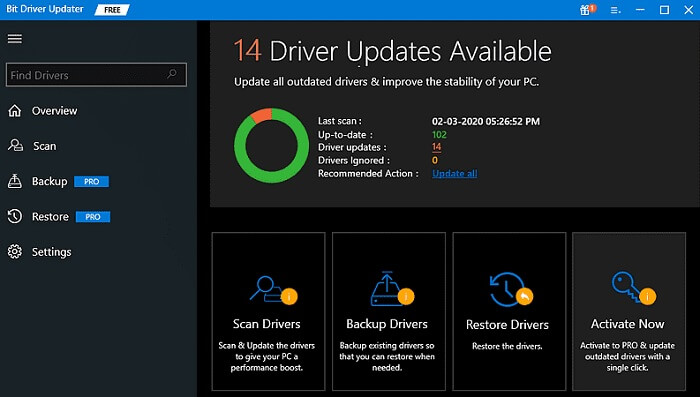
- Once the result screen appears, locate the driver that you want to update and click “Update Now.” To update all the drivers at once, select “Upgrade to PRO.”

You can solve all the computer problems by following the above three steps. Therefore, do not think twice and get Bit Driver Updater.
Laptop Keyboard is Not Working: Solved
You can easily fix the keypad not working problem, thanks to this tutorial. If you run into any issues when putting the aforementioned ideas into practice and require more assistance, don’t hesitate to get in touch with us. We will be happy to help you. Additionally, it would make us pleased if you joined our mailing list and subscribed to our Blog.