

Focusrite is a name that is familiar to guitarists, musicians, songwriters, and anybody else involved in the music industry. To provide you with the ideal recording experience, the brand produces flawless sound interfaces. And one of them is Scarlett Solo. You always obtain studio-caliber, crystal-clear sound using it. Nevertheless, you must first download the Focusrite Scarlett Solo driver for it to run smoothly.
You must make sure the driver is constantly updated after downloading and installing it. Otherwise, problems like the Focusrite Scarlett Solo mic not working on Windows 10 will definitely occur.
This article provides straightforward instructions on how to download, install, and update the Focusrite Scarlett Solo driver. Let’s get started with them without further ado.
Methods to download Focusrite Scarlett Solo Driver, Install and Update it
Below we show you multiple ways to get the Focusrite Scarlett Solo driver downloaded, installed, and updated on your PC.
Method 1: Download Focusrite Scarlett Solo driver from its website:
The website of Focusrite contains all the drivers that anyone needs. You require to identify the compatible ones and then download them on your computer. Go along the below process to do it.
- Travel to the website of Focusrite from this link.

- Hover the mouse over the Support option.
- Choose Downloads from the on-screen options.
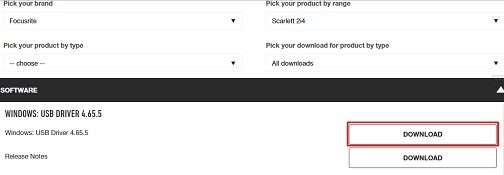
- From the Pick your brand menu, choose Focusrite.
- Choose Scarlett Solo from the Pick your product by range list.
- Click on the button to download the driver file.
- Click on the file that gets downloaded and install the Focusrite Scarlett Solo driver.
Method 2: Download the updated Focusrite Scarlett Solo driver with Device Manager
The in-built driver mechanism in Windows for the management of drivers, i.e., Device Manager, is also one of the ways to get the required drivers. Follow the below process to use it.
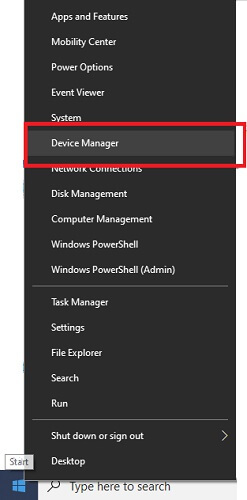
- On your keyboard, press the Windows and X keys.
- Choose Device Manager from the menu you get on the screen.
- Click on the branch named Sound, video, and game controllers.
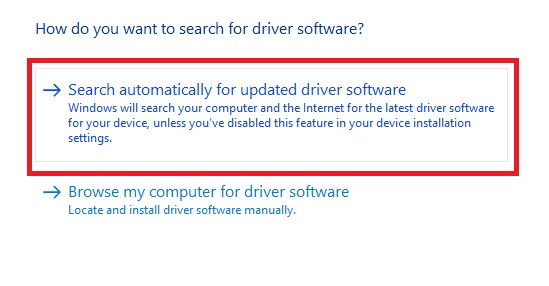
- Right-click on the Focusrite Scarlett Solo driver and select the Update driver tool.
- Pick the first available option, i.e., Search automatically for updated driver software.
- Wait till the Focusrite Scarlett Solo driver is downloaded and installed.
- After completing the process, let your PC reboot.
Also know: Free Music Making Software for Windows
Method 3: Let Windows update:
Performing an update of Windows is also among the manual ways to download the driver for the Focusrite Scarlett Solo interface. Below is how to implement it.
- Call up the Settings by employing the Windows + I Shortcut command.
- From the visible menu, select Update & Security.

- Click on the Check for updates label.

- After Windows is successful in finding an update, download and install the same.
- Lastly, let your computer restart.
Method 4: Download, install, and update the Focusrite Scarlett Solo driver automatically
The success of the manual ways to download the needed driver for the Focusrite Scarlett Solo interface is not guaranteed. Moreover, if you implement these methods wrongly, then your PC’s performance may be severely affected. Therefore, to avoid the risk, we recommend that you use an automatic program like Bit Driver Updater to get the required drivers.
Bit Driver Updater downloads and installs the updated drivers automatically and helps you fix the errors like Focusrite Scarlett Solo not working on Windows 10. Further, it provides a plethora of benefits, such as acceleration of the pace at which driver downloads, creating and restoring driver backups, etc. You can go through the detailed review of this software to learn more about it.
Below we share how to use Bit Driver Updater to download the updated Focusrite Scarlett Solo driver.
- Click on the Download button shared below and then get the Bit Driver Updater’s setup.

- Click on the setup that you got and complete the process of software installation.
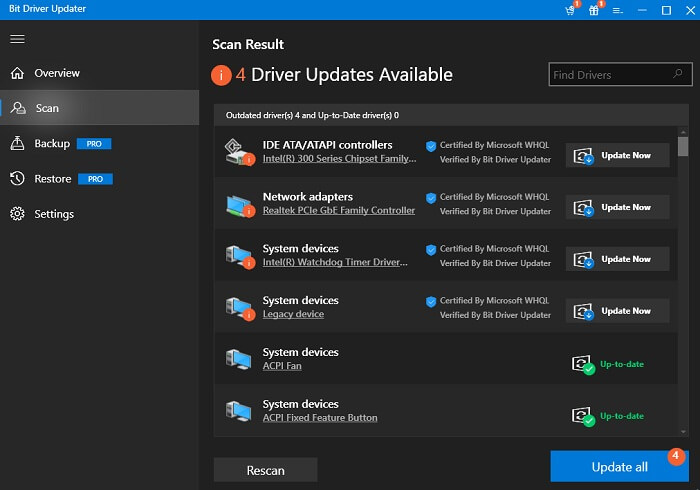
- Let Bit Driver Updater scan the whole computer for a few seconds.
- After the scan, navigate to the Focusrite Scarlett Solo driver in the result list and click on the Update Now button.
For an improved and error-free PC performance, we suggest you choose the Update Now option to get the updated version of all the drivers.
Successfully Downloaded Focusrite Scarlett Solo Driver
The methods to download the Focusrite Scarlett Solo driver, install it, and keep it updated were covered in this post. Any of the methods mentioned above can be used. However, Bit Driver Updater is the method that we advise using to download the most recent drivers. This software not only automatically downloads the most accurate driver updates but also assists in avoiding bothersome problems. Finally, before using your audio interface to its full potential, subscribe to this blog to receive post notifications.