

One of the worst nightmares of nearly every Windows user is the Blue Screen of Death. And if Windows 10’s Kernel Security Check Failure is the problem in question, the situation gets even worse. The majority believe it to be a virus. In actuality, a virus attack is one of the causes of this problem that is bothering you.
There are numerous additional underlying causes of this dreadful error, in addition to viral attacks. We’ll look at the problems that lead to Kernel Security Check Failure in this article, along with some quick remedies.
What Prompts Kernel Security Check Failure on Windows 10
As said above, viruses are one of the prime culprits that cause the stop code Kernel Security Check Failure on Windows 10. In addition to the virus attacks, below are its other central reasons.
- Insufficient memory space
- Out-of-date drivers
- Broken hard disk
- System files getting corrupt
The above list is not where the causes of Windows Kernel Security Check Failure end. There are several other reasons too. But you don’t need to beat your brains out to determine the exact cause in your case. No matter what caused the error, the fixes shared in the below segment will resolve it.
Fixes for Kernel Security Check Failure on Windows 10
Below are the sure-shot fixes to resolve the Stop Code Kernel Security Check Failure on Windows 10.
Fix 1: Enable the Legacy Boot
Kernel Security Check Failure on Windows 10 can be fixed by enabling the legacy boot option. Here’re the steps for the same.
- Restart the PC and enter a bootable media into the drive.
- After the Windows Setup appears, click on “Next.”
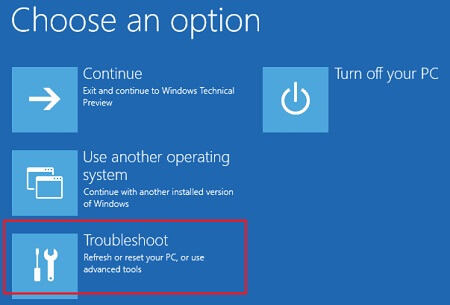
- Now, select “Repair your computer.”
- On the next screen, choose “Troubleshoot.”
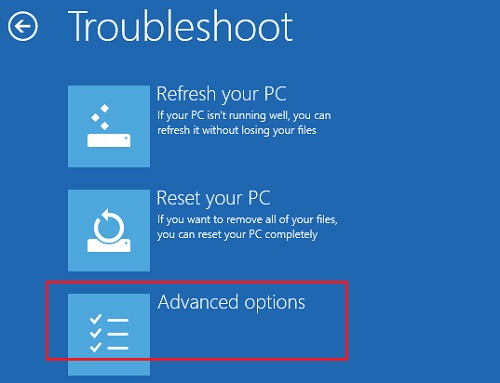
- When the Troubleshoot screen appears, select “Advanced options.”
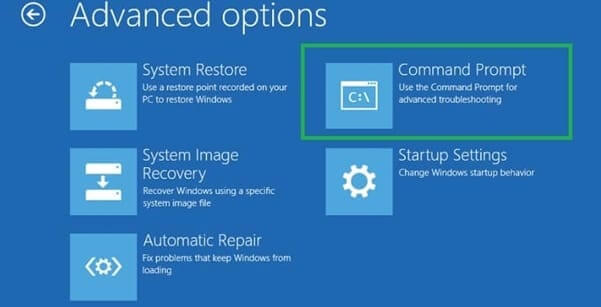
- Click on “Command Prompt.”
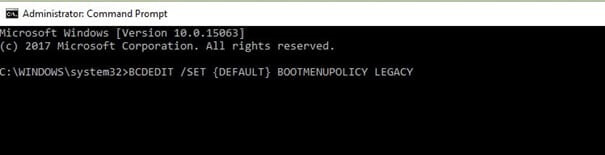
- In the Command Prompt window, type C: and press Enter.
- Type BCDEDIT /SET {DEFAULT} BOOTMENUPOLICY LEGACY and hit Enter.
- Exit Command Prompt and move back to the “Choose an option” window.
- Click on Continue.
Fix 2: Diagnose Memory Issues
Since memory problems are also one of the prominent reasons for Kernel Security Check Failure while installing Windows 10, fixing the issues can help you get rid of this troublesome error. Thus, follow the below steps to diagnose and fix the memory issues.
- In the Windows search box, type “Memory Diagnostic.”
- Choose “Windows Memory Diagnostic” from the search results that appear.

- Click on “Restart now and check for problems (recommended).”

- Wait till Windows detects the memory issues on your PC.
- Follow the on-screen instructions to resolve the problems.
- Reboot the PC.
Also know: How to Solve RPC Server is Unavailable error in Windows 10, 8, 7
Fix 3: Perform SFC scan
Corrupt system files are also among one of the central reasons for Kernel Security Check Failure on Win 10. Therefore, it is essential to check the files and fix the issues. Follow the below steps to do it effortlessly.
- In the Windows search, type “Command Prompt.”
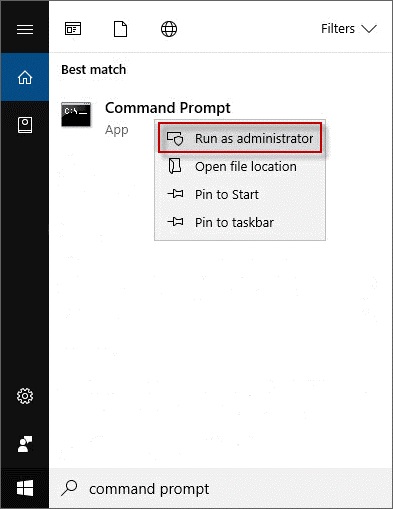
- Right-click on the first search result that you get and choose “Run as administrator.”
- After Command Prompt appears, sfc/scannow and press Enter.
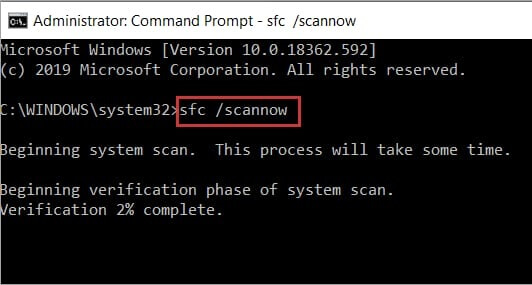
- Wait till Windows scans and fixes issues with the system files.
- After the process is complete, exit Command Prompt.
Also know: Disk Management Software for Windows 10/11
Fix 4: Pay Heed to the Memory Slot
Many times, the incorrect placement of memory slot causes errors such as Windows Stop Code Kernel Security Check Failure. Therefore, to resolve the issues, check whether the memory slot is correctly placed or not. If not, then replace the slot or plug it into a different slot on the motherboard.
Fix 5: Perform a Disk Check
To make Kernel Security Check Failure Windows 10 error fixing, it is important to check the disk and resolve the problems, if any. Therefore, implement the below steps to run a disk check.
- Launch “Command Prompt” as administrator.
- After Command Prompt comes up, type “chkdsk D: /f.” Here in place of D: write your drive partition and hit Enter.
- Run the /r and /x commands in the same way.
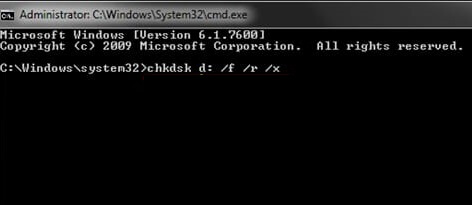
- Wait till the disk check is complete and issues are fixed.
Fix 6: Update your OS
A Windows update resolves most of the issues, such as Kernel Security Check Failure on Windows 10. Thus, upgrade your OS via the steps shared below.
- In the search box on Task Bar, type “Settings.”
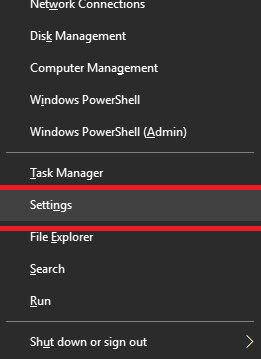
- Select the first result that is displayed on the screen.
- Click on “Updates & Security.”

- Go to the “Windows Update” pane and click on “Check for updates.”
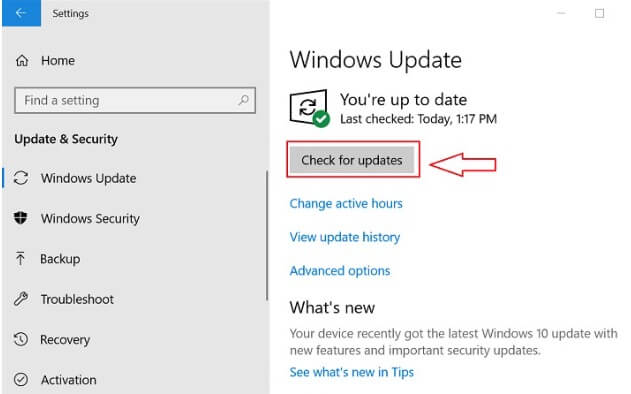
- Lastly, wait till Windows downloads and installs the available OS update.
Also know: How to Solve Display Driver Failed to Start Error on Windows 10
Solved: Kernel Security Check Failure on Windows 10
In this article, we offered some tried-and-tested solutions for Windows 10 Kernel Security Failure. We sincerely hope you found them helpful. Please use the comment section below to let us know whether they were helpful for you as well as any other ideas you may have for this topic. For more of these quick and easy tech solutions, follow us on social media and subscribe to this site.