Today, smartphones are among the most necessary elements of our life. More than 60% of people sleep with their phone next to them and check it first after waking up. Therefore, considering the importance of mobile apps, almost every business now has mobile apps in place to keep their audience engaged.
It’s very crucial to build a mobile application that reflects your idea, but what next? Building a mobile app means you’re half done. But one must also be concerned about how to submit and release your app on the Google Play Store. For beginners and first-timers, publishing an app on the Google Play Store can be a daunting process.
Google Play Store is undoubtedly one of the largest platforms for distributing, promoting, and selling Android apps. Publishing your Android app on Google Play is thrilling and an essential element of your mobile app strategy that affects its final success. Will your app be submitted, successful or prevalent, and will people install it or not? All this and more depends on how productive your release will be.
Like any other app store, Google comes with its own set of rules, guidelines, and processes, and you need to understand how it works to avoid any future concerns. So, let’s go through the step-by-step process of submitting and publishing your app to the Google Play Store.
Submit Android App To The Google Play Store Easily
Let’s move on to the steps regarding how to upload an app to the Google Play Store. Make sure you follow each in the exact chronological order to avoid any mistakes in the process of publishing an App on the Google Play Store
Step 1: Create a Google Developer Account
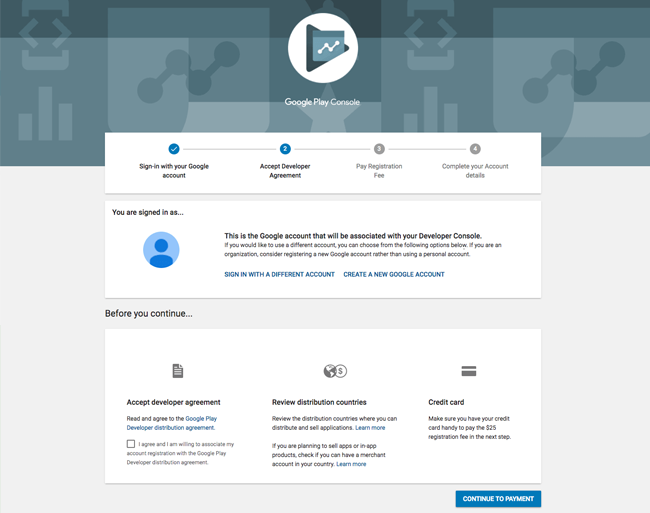
Creating a Google developer account is something you can do early on in the mobile app development process. Without registering for a Google developer account, you will not be able to publish your app to the Google Play store. You can make use of your existing Google accounts or create a new account to register for a Google developer account.
It doesn’t matter whether your Google Developer Account is private or corporate. You can quickly switch your app to another in the future. The account creation procedure involves signing the Developer distribution agreement, adding personal information, and paying a one-time $25 registration fee.
There is nothing complicated in this process. You just need to follow the instructions. It usually takes less than two days to get Google approval. Moreover, you don’t have to worry about forgetting to add some information. You can also change your account later.
Have an app idea? Talk to our mobile app developers to turn your idea into reality!

Step 2: Add a Merchant Account
If you are going to sell paid apps or in-app purchases, you need to create a Google Merchant Account. Here you can manage your monthly expenses along with app sales and analyze sales reports. After you finish creating a merchant profile, the developer account will connect to that profile automatically.
Step 3: Prepare the Documents
Paperwork always needs much effort, especially when it comes to any legal documents. Based on our experience, we strongly recommend preparing an End User License Agreement (EULA) and Privacy Policy in advance. You can then take documents from similar applications as a reference and create your own from them or do everything from scratch.
A EULA is an agreement between you as the owner and the people who use your product or service. In short, it includes:
-
- What users can do with the Application and what they aren’t allowed to do.
- Licensing fees
- Intellectual property information.
Terms and conditions or terms of use describe what services you provide to your users and how you expect them to act in response. However, Google doesn’t demand Terms of Use. Instead, you can create a document, add the Privacy Policy, and Terms of Service sections.
Pay special concentration to include the following information in the Privacy Policy:
-
- A comprehensive list of personal data that is collected, processed, and used through the Application.
- Technical information about the device and the OS installed in the machine.
- Functional features of the app, whether its paid and free functionality.
- Place of registration of the company or location of the copyright holder of the Application.
- The selected legal system and legislation applied in resolving disputes and regulating legal relations.
- The terms and the conditions of the subscription.
- Citizenship (residence) of the overwhelming majority of app users.
- Age criteria and the existence of specific content.
Step 4: Understand Google Developer Policies
Once you have made up your product concept, now it’s time to ensure that every feature you will incorporate in the Application aligns with the Google Developer Policies. These documents describe how applications should be developed, updated, and promoted to meet the high standards of the store.
If Google determines that your product violates specific policy chapters, it could be blocked, rejected, or even removed from the Google Play store. In addition, various recurring violations can lead to the termination of the developer account.
Therefore study all the available information carefully regarding:
-
- The content description is limited
- Store listing and promotion
- Impersonation and intellectual property
- Guidelines for monetization and advertisements
- Privacy, security, and deception regulation
- Spam and minimum functionality
Google is continuously working on its policies, and it’s crucial to monitor the changes and stay informed even after your Application is published.
Step 5: Technical Requirements
After going through the constant app development process, testing, bug fixing, you can finally upload the app to the Google play store. Before you move on to the upload procedure, you need to check the following factors:
-
- Exclusive Bundle ID
You can specify the package name in your app manifest. The package name should be appropriate for your app idea because You cannot change it after the distribution.
-
- Signed App Release With a Certificate
Every application is digitally signed with a developer’s certificate. The certificate is used to recognize the creator of the application and cannot be reprocessed.
-
- The App Size
Google sets the app size limit of the uploaded file: 100MB for Android 2.3 and higher (API level 9-10, 14 and higher) and 50MB for earlier Android versions. Of course, if your app exceeds this app size limit, you can switch to the APK extension file.
-
- The File Format
Google accepts two possible release formats: app bundle and .apk. However, .aab is mainly preferred. To use this format, you must have a Google Play app subscription. You can read more about the application file specifications in the developer documentation release guide.
Step 6: Creating an Application in the Google Console
Now you have the file that is all set to upload. Now, it’s time to get into the exciting part. Let’s build a new application in your Developer Account:
-
- In the menu, reach to All applications tab
- Now select an option Create Application
- From the drop-down menu, select the app’s default language
- Add a brief app description that you can edit later also.
- Tap on Create
Hereafter, you will be taken to the store entry page, where you have to add the complete data about the Application.
Step 7: Store Listing
Let’s first prepare the Store listing. It includes the most crucial information, which is beneficial for app store optimization (ASO), and provides the users more details about your Application before downloading. Here the mandatory segments are indicated with *.
It may take some effort from a designer and copywriter, so starting early with the following materials is better.
-
- Product description
It includes a title of your app (up to 50 characters), a brief description (up to 80 characters), and a complete description (up to 4000 characters). Limit yourself, and do not exaggerate the keywords.
-
- Screenshots
You can add up to 2 to 8 screenshots. Select the ones that demonstrate the app functionality and value the most.
The requirements are as follows:
– JPEG or 24-bit PNG (no alpha)
– From 320px to 3840 px
– The ratio of the long side to the short side should not be above 2:1
– Store listing – Product details
-
- Icon
The requirements are as follows:
– 512px by 512px
– 32-bit PNG (with alpha)
– Maximum file size: 1024KB
-
- Feature graphic
It is not a mandatory marketing tool displayed in different places on the Play Store, such as the homepage.
The requirements are as follows:
– JPEG or 24-bit PNG (no alpha)
– 1024px x 500px
-
- Promo video
If you have any promo videos or commercials, you can add a link to your YouTube channel. This video will be shown before the screenshot on the app page.
-
- Tags
You may select from the list the most relevant app keywords for better app store optimization. Unfortunately, there is no probability of adding any custom tags.
-
- Localization
If your application supports multiple languages, mention them and add a translation of your application information. In addition, we recommend adding screenshots and localized images.
-
- Application type and Classification
Firstly, in the drop-down menu, choose the app type: game or app. Then select the category your app belongs to. You can also add a section after uploading the APK to Google Play to rate your content.
-
- Contact details
Here you will need to provide contact information for the support service. By filling in the website URL, email address, and phone number, it will be easier to contact you when needed.
-
- Privacy Policy
Google needs you to add a link to the Privacy Policy. Then, while editing the Store Listing, you can relax at any moment, click Save Draft, and complete this stage later.
Step 8: Content Rating
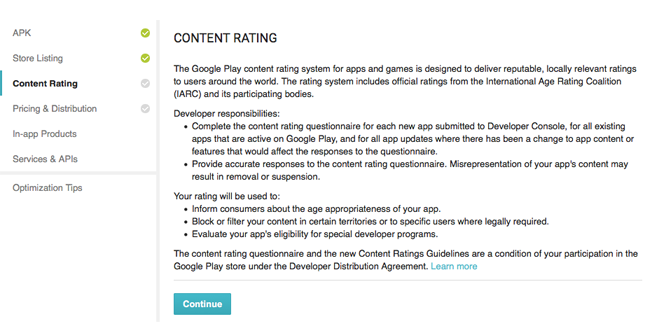
To prevent the application from being marked as an unrated application, which could lead to its removal, conduct a rating questionnaire. You can find this in the menu on the left. The information provided in the questionnaire must be correct. Any tampering with your app’s content may result in the suspension or deletion of your Play Store account.
-
- Click on Save Questionnaire once the survey is completed
- Click on Calculate Rating
- Finally, click on Apply Rating to confirm the rating and move ahead with the pricing & distribution plan
Step 9: Pricing the Application
In the Pricing and distribution section, you have to fill in the following information:
-
- Whether your app is paid or free
- Where the app will be available (select the countries from the list)
- Whether your app will be accessible only on the particular devices
- If the app contains sensitive content and is not suitable for children under 13.
- Whether your app contains ads
Remember that you can change your paid app to a free one later, but you cannot do vice versa. Therefore, if you decide to offer it for money, you will have to create another application.
Step 10: Upload APK and Submit it for Review
At last, you are all set to upload your app file. Next, go to the App Releases section on the left panel. Here you will find three options for publishing your app: Production, Beta, and Alpha tracks. It is recommended that you should start with an alpha or beta version. In this case, after passing the verification process, people in the Play Store will not be able to access your application.
The Alpha version accepts closed testing and is only available to people you invite as testers. In the Beta version, anyone can join your testing program and send feedback. Finally, pre-testing allows you to gather ideas and opinions from people, test your application with a wider audience, and fix issues before it goes public.
Please note that if you later decide to upgrade from alpha or beta to production, it will take time to go through another verification round.
Once you select the type of release, follow the steps:
-
- Select Manage (Production/Beta/Alpha)
- Click on Edit Release
- Upload an APK or app bundle
The version name will be added automatically. Alternatively, you can remove text from the What’s new in this release field for the first time.
-
- Click on Review to confirm the changes, and by clicking Start rollout to production, you can send your app to the Review.
Don’t worry if you forget to add some extra information. Google will show you guidelines and recommendations all the way. Unfortunately, you will not be able to submit your application for review if something of substance is missing.
Please be aware that in the first version, there is no way to set up manual publishing. The application will start immediately after passing the verification. It usually takes up to 2 days. However, Google says the verification process can take up to 7 days or even longer. You will receive a notification on the Google Console dashboard as soon as the app is reviewed.
Frequently Asked Questions
Q1. How Long Does it Take to Publish an Application on the Google Play Store?
There is no fixed deadline for publishing apps on the Google App Store. However, the process of applying to the Google Play Store is concise and straightforward. As a result, the processing time and selection of your application can vary from hours to days.
Google claims that the verification process can take up to 7 days or even longer. But usually, it takes up to 2 days. Please, remember that it may take a few days to fill in all the essential information in the Google Developer account before submitting the Application.
Q2. How Much Does It Cost To Publish An Application On the Google Play Store?
Apart from the app development cost, you should pay a one-time registration fee of $25. After this, all the apps you publish on the Google app store for Android app development are free of cost.
Conclusion
We hope that the above instructions help you guide through how to publish an app on google play. Once you publish your app to the Google Play store, you require an active marketing strategy to attract customers. Android apps need constant effort to succeed after being published, otherwise the competition will overtake it.
Numerous mobile app development companies can help you make the most out of your new application. Also, they will help you to promote it to ensure people know about it and find it interesting enough to download. Also, make sure you invest in sustaining your app in the long term. Keep refining and upgrading it, and evaluate its performance to become an even better product for your customers.
Your blog is very interesting. Your level of thinking is good and the clarity of writing is excellent. I enjoyed so much to read this post.
Good read!
Amazing post I must say.
I was looking info to submit my app on Play Store and your blog helped me a lot.
Thanks for sharing.