
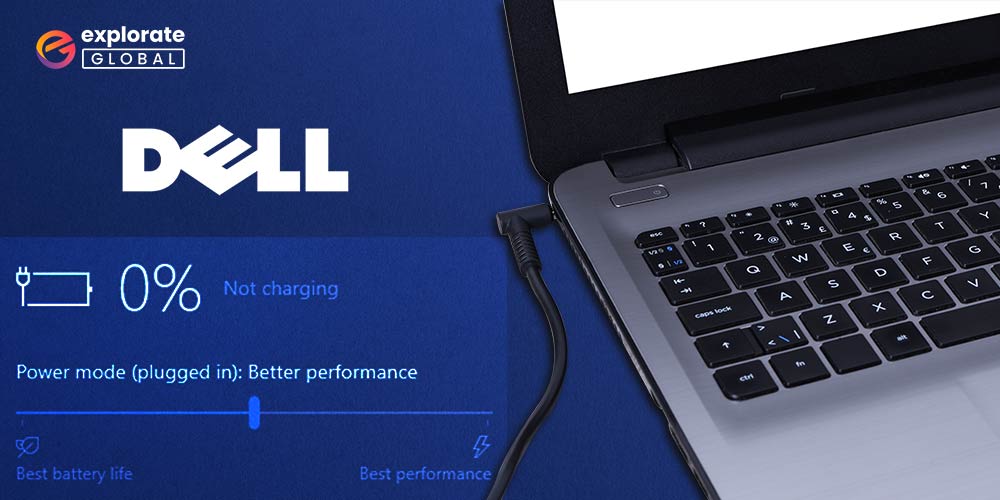
This article shares the quick and easy fixes for Windows 10 Dell laptop plugged in but not charging. Battery issues are quite common in all laptops, but they become even more frustrating when the notebook PC does not even charge. The same is happening with many Dell users after updating to Windows 10. After the Windows update, their Dell laptop is plugged in but not charging on Windows 10. If you are one of those troubled fellows, then do not worry and keep on reading this article.
Like you, several other Dell users have also complained that the AC adapter, i.e., the charger is not recognized on their Dell laptops. We understand you want to fix this problem as soon as possible. Therefore, we are here with the quickest fixes to resolve this issue.
But, before we move to those solutions, it is crucial to get to the roots of this problem so that solving it becomes easier. Hence, below we answer a frequently asked question, i.e., “Why is my Dell laptop plugged in but not charging?” However, if you want to know the solution first, then below is a quick snapshot of the best fix.
Quick Fixes for the Dell Laptop Plugged in but not Charging Windows 10
Below is how to fix the Dell laptop plugged in but not charging problem on Windows 10 quickly and easily.
Solution1: Run the Troubleshooter
Windows has a troubleshooting system for everything including battery issues. Therefore, you can perform the battery troubleshooting to fix the Dell laptop plugged in but not charging on Windows 10 issues. Comply with the steps shared here to do it.
- In the search bar, type “Troubleshoot settings” and select it from the results that you get.
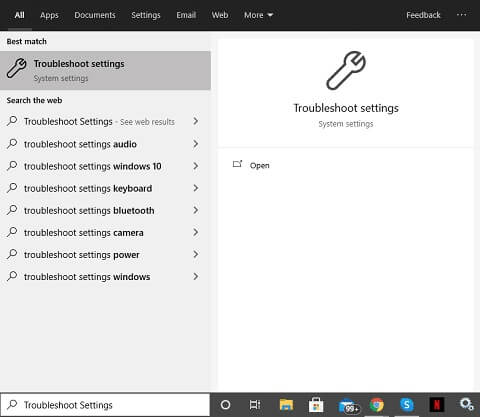
- Click on the “Power” option present on the right side of the screen. If you do not find the Power option there, then click on “Additional troubleshooters” to get it.
- Click on “Run the troubleshooter” open to initiate the troubleshooting process.

- Follow the on-screen directions.
- After the troubleshooting is complete, check whether the Dell laptop is recognizing the charger or not.
Solution 2: Connect the AC Adapter and Battery Again
If the AC adapter is not recognized on Dell, then one fix is to connect the adapter and battery again. Follow these directions to do it.
- Power off the laptop.
- Remove the adapter and battery from the laptop.
- Press the power button and hold it for about 20 seconds to discharge the residual power of your laptop.
- Connect the AC adapter and battery back to the laptop.
- Power on the device and check whether the Dell AC adapter is recognized or not.
Also know: Snappy Driver Installer Review
Solution 3: Connect the AC Adapter to a Wall Socket
If you use a surge protector, then it can also be one of the reasons for which the Dell laptop is plugged in but not charging on Windows 10. Therefore, connect the adapter directly to the wall socket and check whether the problem is fixed or not. If the issue persists, then try using another adapter. If the new adapter is working correctly, then get the old one replaced.
Solution 4: Install the Battery Driver Again
It might be possible that the battery driver is not correctly installed on your laptop. Therefore, to fix the problem of Dell laptop not recognizing the charger, reinstall the battery driver through these steps.
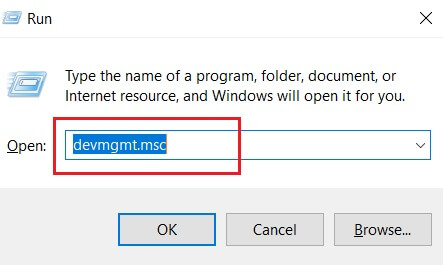
- Evoke the Windows 10 Run box by using the “Windows + R” shortcut command.
- When the Run box pops up, type “devmgmt.msc” and select “OK” to call up the Device Manager.
- When the Device Manager is evoked, click on the “Batteries” section to expand it.
- Right-click on “Microsoft ACPI-Compliant Control Method Battery” and select “Uninstall device.”
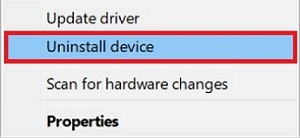
- Now, a dialog box appears on the screen asking you to confirm your actions. Click on the “Uninstall” option.
- Restart the laptop so that Windows can once again install the battery drivers.
Solution 5: Update the BIOS
As said earlier, if the BIOS settings are incorrect, then various problems like the Dell laptop plugged in but not charging on Windows 10 may come your way. Therefore, follow the instructions shared below to update BIOS.
- Go to the official website of Dell.
- Click on the “Support” option.

- Select “Product Support” from the drop-down menu.

- In the search box, enter your laptop model, Service Tag, or Dell EMC Product ID, and click the “Search” button.
- Go to the “Drivers & Downloads” tab.
- Click on the “Download” button to download the available BIOS update.
- Follow the on-screen instructions to install the downloaded update.
Also know: Snappy Driver Installer Review
Solution 6: Update the Battery Driver (Recommended)
Outdated drivers are the top cause of almost every problem that a computer user faces including the Dell laptop plugged in but not charging on Windows 10. Therefore, to resolve this issue, you need to update the battery driver. There are multiple ways to do it. For instance, you can do so through the Device Manager manually. But, all these manual methods are tiring, take a lot of effort, and involve some kind of technical knowledge. And if you update the drivers wrongly, then it may make the situation worse. Hence, we recommend an easy way of updating the drivers. You can update the drivers automatically in just one click with Bit Driver Updater.
In addition to one-click automatic driver updates, this software also provides you with numerous benefits such as improved, smooth, and fast laptop performance. Moreover, you can trust this program completely as it downloads only WHQL-certified drivers. Below is how to use Bit Driver Updater for updating the battery driver.
-
- The first step is downloading and installing Bit Driver Updater from the link shared here.

- The first step is downloading and installing Bit Driver Updater from the link shared here.
- Now, let the program run the laptop scan automatically or perform it manually by selecting Scan.
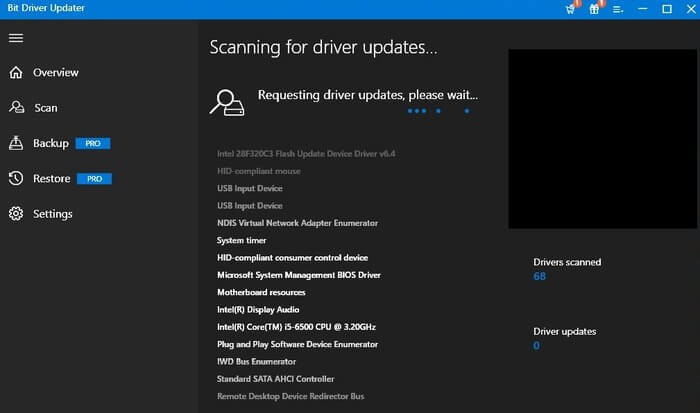
- Wait for two to three seconds to view the scan results.
- After the results are displayed, click on the “Update Now” button visible in front of the battery driver to update it.
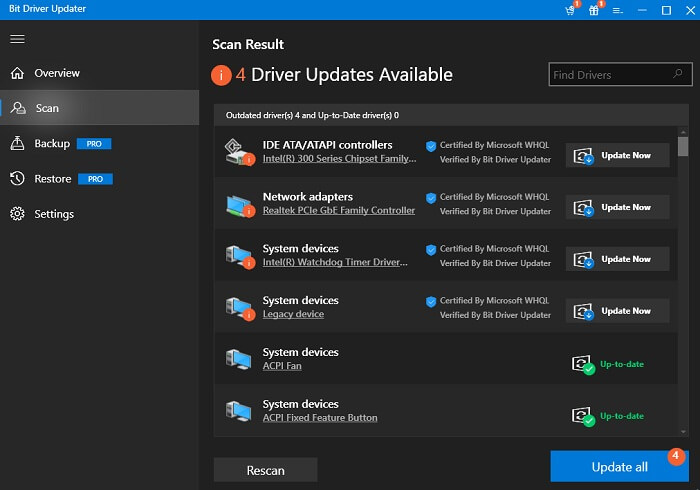
You can also choose to update all the drivers automatically in one click by selecting the “Update All” option. If you do that, then you get many other benefits such as an option to exclude drivers from the scan, create driver backups and restore the same, increase the download speed of drivers, etc.
If you want to fix the Windows 10 Dell laptop plugged in but not charging problem in no time and elevate the laptop performance at the same time, then we suggest you get Bit Driver Updater.
Also know: Snappy Driver Installer Review
Windows 10 Dell Laptop Plugged in but not Charging: Fixed
This article brought to the fore some quick and easy workarounds for the Windows 10 Dell laptop plugged-in but not charging problem. In our view, updating the battery driver by using Bit Driver Updater is the best way to solve this and all the other problems. However, if you know about any other better ways to fix this issue, then feel free to share them with us.