
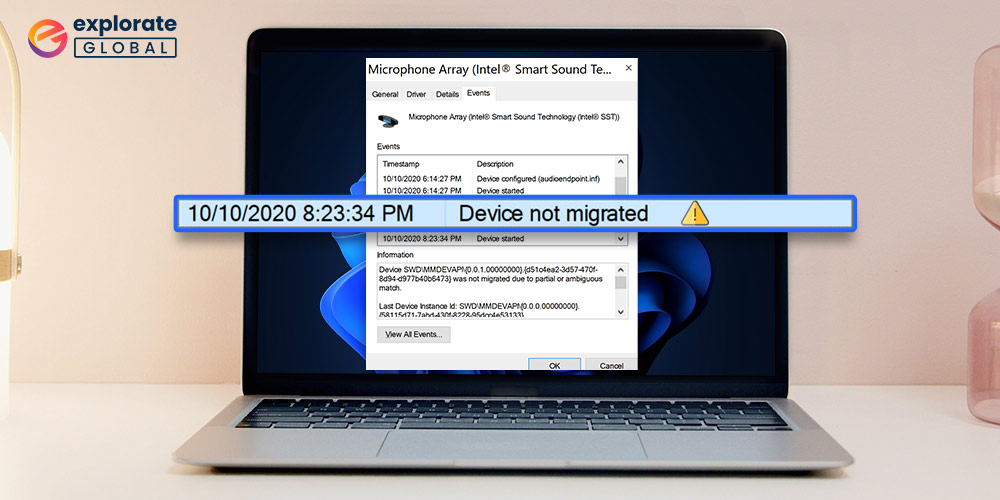
Continue reading to learn how to easily resolve the “Device Not Migrated” error. The “Device Not Migrated” error is possibly the most problematic system error we have covered so far. We are referring to it as the most annoying error because, unlike other Windows errors, it does not pop up on the screen automatically. This error needs to be located manually. Therefore, before discussing how to resolve the “Device Not Migrated” error, we first cover how to determine it.
What is the “Device Not Migrated” error?
In simple terms, you get this error when Windows fails to migrate device drivers correctly after an OS update. Thus, it means that the driver migration process is not completed properly. As you are now aware of the answers to the two most common questions, understanding how to fix the “Device Not Migrated” error will be as easy as pie for you.
How to fix the “Device Not Migrated” Error Easily
Below is how to fix the “Device Not Migrated” error with the least effort from your end.
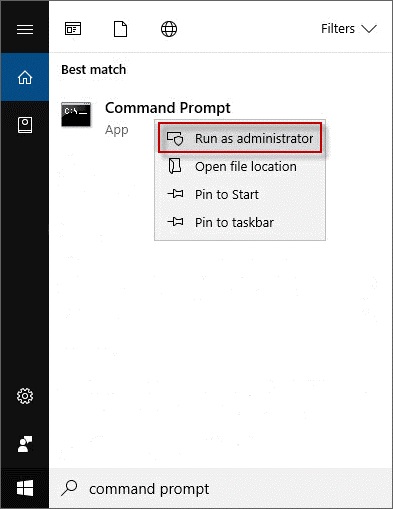
Method 1: Check the system for damaged files
Damaged system files are one of the major causes of the “Device Not Migrated” error. Thus, here are the steps to check for damaged files on your system.
- In the search box, type “Command Prompt”, right-click the topmost result and select “Run as administrator”.
- After Command Prompt opens, type “sfc /scannow” and press Enter.
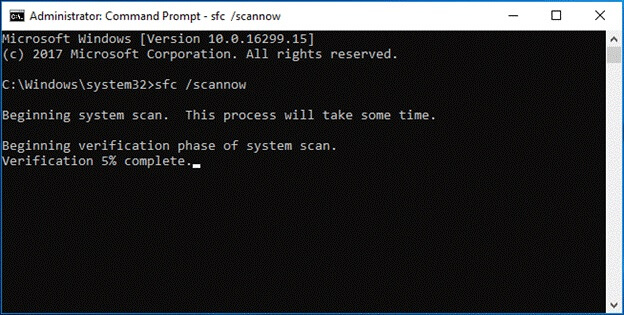
- Wait for a few seconds till the system scans and fixes the damaged files.
Hopefully, you got the answer to the question of how to fix the “Device Not Migrated” error. If not, then jump to the next method.
Also know: How to Fix Camera Missing in Device Manager Issue on Windows PC
Method 2: Install the problematic driver again
Incompatible drivers also result in the “Device Not Migrated” error. Therefore, reinstall the problematic driver to fix the issue.
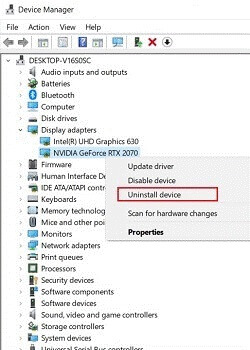
- Open Device Manager.
- Locate and right-click on the device that is causing problems.
- Select “Uninstall device” from the menu that you see on the screen.
- Click on “Uninstall” to confirm the uninstallation of the incorrect driver.
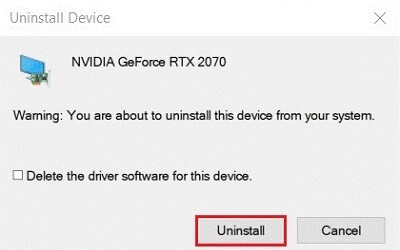
- Lastly, restart your computer.
After restarting, Windows installs the compatible driver and fixes the “Device Not Migrated” error. If the issue is still not resolved and you are wondering how to fix the “Device Not Migrated” error, then try the next solution.
Method 3: Upgrade Windows
Sometimes, updating Windows to the latest version fixes the “Device Not Migrated” error. Thus, below are the steps to perform Windows updates.
- Click on the Start icon and choose Settings.
- Move to Update & Security and select “Windows Update”.

- Lastly, choose “Check for updates”
After you complete the above steps, Windows downloads and installs the latest OS version on your device.
Method 4: Set the BIOS to factory settings
Incorrectly configured BIOS settings PnP from detecting your device. PnP, i.e., Plug and Play is a newly introduced Windows feature that helps the device to migrate the drivers successfully after an OS update. Below is how to reset it to factory settings and fix the “Device Not Migrated” error.
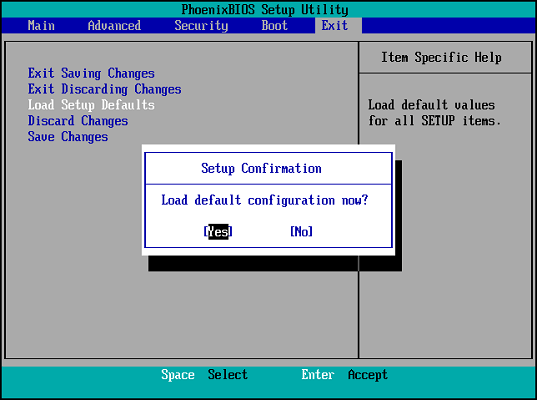
- Restart the PC and enter the BIOS settings.
- Locate the option that lets you reset the BIOS settings. It can be Setup Defaults, Load Defaults, Load Optimal Defaults, or Load Setup Defaults.
- Click on “Yes” to confirm the reset.
Hopefully, now the “Device Not Migrated” error won’t trouble you. If it still gives you trouble, you can also try updating the BIOS. Even after that, if the issue rears its ugly head, try the below solution.
Also know: Download & Install USB Mass Storage Device Driver on Windows 10/11
Method 5: Use Bit Driver Updater to update the chipset driver
An outdated chipset driver is also one of the reasons you are here in the search for how to fix the “Device Not Migrated” error. Thus, you need to update it. Updating the chipset drivers can be done both manually as well as automatically. However, we would not recommend the manual way, as it is cumbersome and requires a bit of technical knowledge. Therefore, we suggest you update drives in a jiffy via Bit Driver Updater, i.e., the best driver updater available in the town. Below is how to use it.
How to use Bit Driver Updater for Updating Chipset Drivers
Using Bit Driver Updater is a cakewalk. All that you need to do is, follow the below-mentioned steps.
- Download Bit Driver Updater from the link given below.

- Install and launch the software.
- After Bit Driver Updater opens, you see “Scan” in the left pane. Click on it.
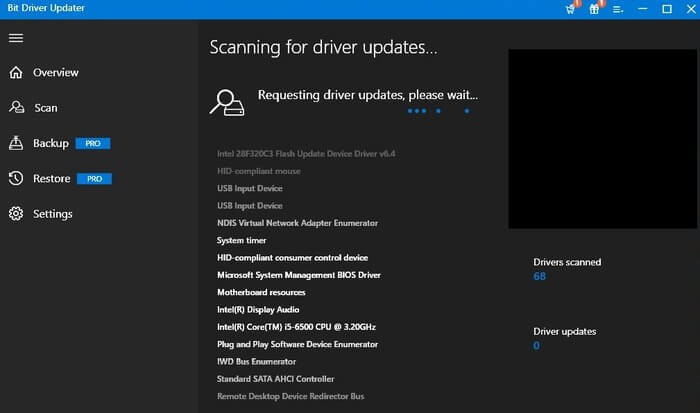
- Be patient and wait till the scan completes (It only takes a moment to finish).
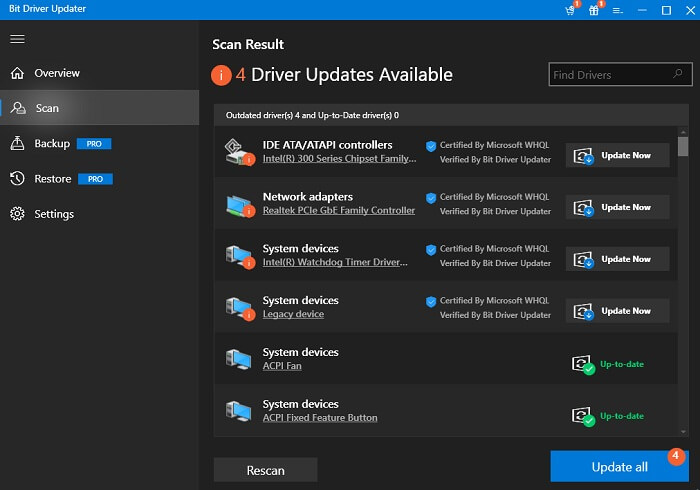
- After the scan completes, choose “Update All” to get the latest drivers installed on your device.
Now, a question that erupts is why we are recommending only Bit Driver Updater and not any other utility. We have some good reasons for doing so. Here they are.
Fixed: Device Not Migrated Error
This article addresses your query, “How to resolve the “Device Not Migrated” error? We hope that the techniques mentioned above were useful. Please let us know which method worked for you in the comment section below. For more quick and easy tech fixes, subscribe to our newsletter. We’ll return soon with another similar post. You can browse our blog in the meantime to discover other irritating tech issues and how to fix them.