
Logitech is one of the leading manufacturers of PC peripherals. From keyboards to mouses, whether wired or wireless, Logitech manufactures almost every computer device. One of the popular Logitech products is its G433 gaming headset. It is quite famous among the gamers community. However, while using the headphone, some of the users have reported the ‘Logitech G433 Mic Not Working’ issue.
It is one of the common problems that the G433 headset users have faced. If you are also one of them and came here looking for a solution, then just relax. Here we are going to provide you with multiple ways to fix the Logitech G433 headset mic not working problem. Before we start resolving the issue, first, let’s get a quick overview of the most recommended way to fix this issue.
Methods to Fix Logitech G433 Mic Not Working Issue
There are multiple reasons for the ‘Logitech G433 Mic Not Working’ issue. Hence, below we have listed several solutions to fix it. All of them are quite effective.
Check the Connection
The foremost thing that you have to do while facing the Logitech G433 not working problem is to check the physical connection. We know that it’s quite a silly solution, but some people often forget to connect the device properly to their PC. Hence, we advise you to unplug the G433 headset and plug it again into your PC. You can also try switching the ports to make sure whether the problem is with a particular port, or your Logitech headset. If this doesn’t fix the problem, then move to some other solutions mentioned in this post.
Also know: How to Test Microphone on Windows PC
Enable Microphone
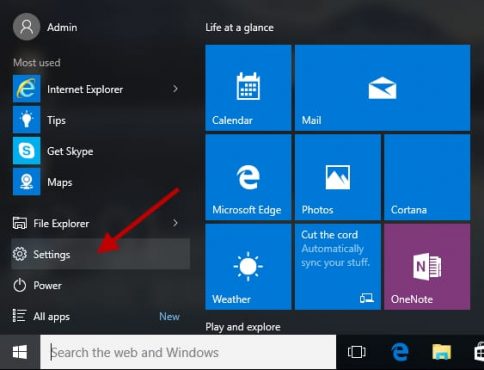
Another primary fix for the ‘Logitech G433 Mic Not Working’ error is checking whether you have enabled the microphone or not on your computer. If it is not, then you have to enable it. Want to know how? Here are the required steps that can guide you toward resolving this Logitech G433 headset issue.
- Go to Start and click on Settings.
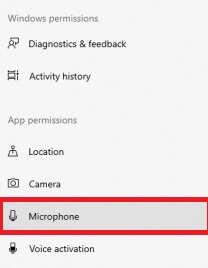
- Choose Privacy.

- Look for the Microphone and click on it.
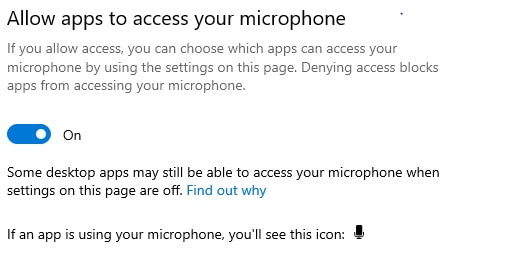
- Turn the Microphone access for this device toggle on if it is off.
- After that, come to ‘Allow apps to access your microphone’ and enable it as well.
- Now, go to ‘Choose which Microsoft Store apps can access your microphone’ and provide permission to the applications you want to access the microphone.

Also know: How to Fix Logitech C920 Webcam Not Working on Windows 10
Try Setting the Microphone as Default Device
It is also possible that your PC is unable to set your microphone as the default device, and it can eventually cause the ‘Logitech G433 headset mic not working’ problem. Hence, you have to manually set the microphone as the default device to resolve this issue. Here are the steps that you can use to do so.
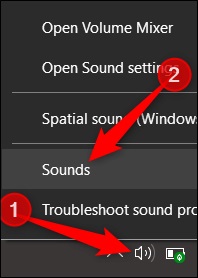
- Look for the volume icon on your PC’s taskbar.
- Right-click on it.
- Choose Sounds.
- Select the Recording tab.
- Choose Microphone.
- Click on Set Default.

- Click Apply and then OK.
Restart Windows Audio Service
All the tasks and functionalities of your PC and its devices are related to their dedicated services. Hence, any problem in Windows Audio Service can cause the Logitech G433 mic not working issue. That’s why we advise you to restart the Audio Service to resolve this error. Here are all the required steps.
- Press Windows Key along with R simultaneously.
- Enter the ‘services.msc’ command.
- Click OK.

- Scroll down to Windows Audio.

- Right-click on it.
- From the context menu, choose the Restart option.
Now as you have restarted the Windows Audio Service, check if the mic of your Logitech G433 still not working, or it has started functioning.
Update Logitech G433 Drivers
Faulty drivers can cause a number of problems on your PC. Hence, no wonder that the Logitech G433 mic not working issue is also a result of a problematic Logitech driver. But, do not worry. You can easily repair your Logitech G433 drivers by updating them. Here are the effective ways through which you can upgrade them.
How to Update Logitech G433 drivers via Windows Update
This is the method to update all the system software, drivers, and programs installed on your PC. Here are the required steps to upgrade Logitech G433 drivers via Windows Update.
- Go to Start and click on Settings.
- From the options available in Settings, select Updates & Security.
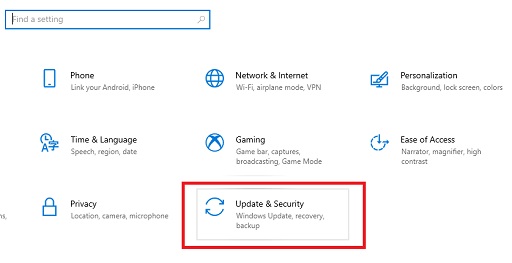
- In Update & Security click on the ‘Check for updates’ tab. You can find it easily under the Windows Update.

Now Windows will automatically update all your drivers and software installed on your PC. But, this method is quite ineffective and time-consuming as it upgrades the entire system.
If you want an easy and time-saving alternative, then check the next method.
How to Update Logitech G433 Drivers Via Bit Driver Updater
As you have seen how tedious it is to update your device drivers, you might be looking for an easy way to do so. In that case, Bit Driver Updater is the best utility that you must try to update your Logitech G433 drivers. It provides effortless driver updating experience, advanced features, and everything that you want in a third-party driver updating program.
You can try it for free as well. But, for a more than satisfying experience, we recommend the premium version of the program. It is the safest tool available. Hence, you can spend your money on it. Bit Driver Updater even claims a full refund to its users if they don’t get satisfied with the tool. You can check its refund policies for more details.
Here is the download button from where you can get Bit Driver Updater and try it on your PC.

After downloading the program, just follow the below-mentioned steps.
- Install Bit Driver Updater utility.
- Open it.
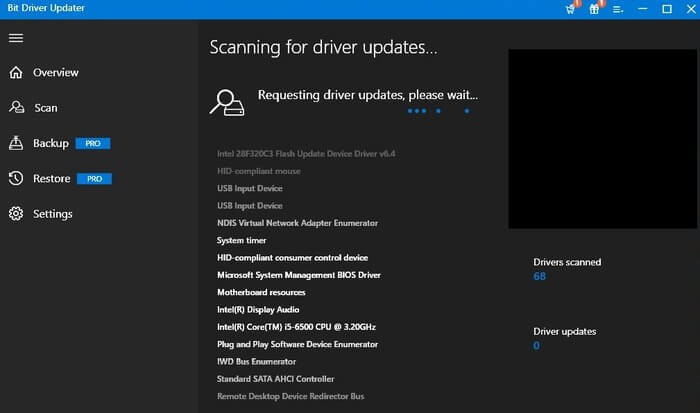
- To start the scan for faulty drivers on your PC, select Scan Drivers.
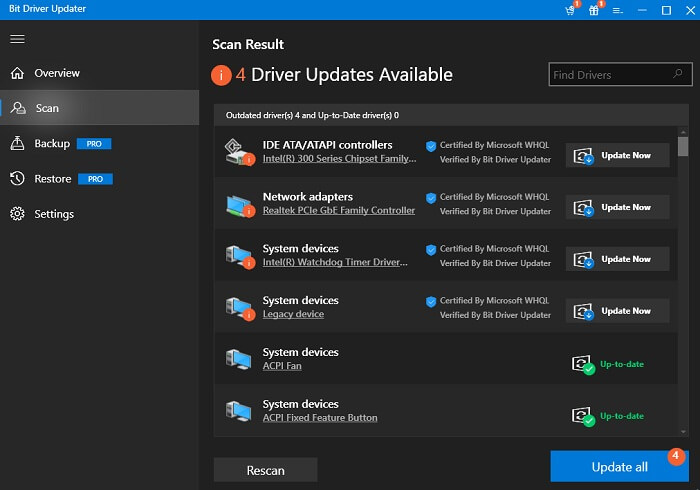
- Once you get the results, go to the Logitech G433 driver in that list.
- Select Update Now to resolve Logitech G433 mic not working problem.
Also know: How to Solve HyperX Cloud Stinger Mic Not Working Problem
Conclusion:
So, these were some of the fixes that you can use to resolve your mic not working problem with the Logitech G433 headset. We have provided all these methods as per the different reasons for the issue. Hence, you can use any of them to fix the Logitech G433 mic not working error depending on your requirements. However, if you know of any other effective solution, then it would be great if you share it with us.