
Today we are going to discuss the possible solutions for the Dell laptop black screen problems.
Dell is one of the renowned names in the Windows PCs and Laptops industry. But, as the blue and black screen issues are quite common, hence Dell users also face it. Even the users of one of Dell’s premium laptops, i.e., Dell Inspiron, have reported the black screen problems.
There are multiple reasons for the Dell black screen issue and so the solutions. If you also face the situation when the Dell laptop turns on, but the screen is black, then you can try these ways to recover from it. So, without adding more to this, let’s check the methods to get rid of the Dell laptop black screen situation.
Methdos to Fix The Dell Laptop Black Screen Problem
As we discussed earlier, there are several causes and solutions for the Dell laptop black screen issue. Below we have mentioned the most effective ones among them.
Method 1: Shut Down Your PC Forcibly
The first thing we do when we face a system crash or any other error on Windows PC is restarting the computer. But, while facing the black screen issue, when the Dell laptop screen won’t turn on, the only way to restart your system is shutting down the system forcibly. After that, you can start your PC again. Here are the proper instructions to do so on a Dell Inspirion or any other popular Dell laptop.
- Eject all the connected peripherals and external computer devices.
- Press the power button of your Dell laptop for around 10 – 20 seconds.
- Remove the battery of your laptop and disconnect the AC adapter.
- Press the power button for almost 60 seconds.
- Connect the battery and the charger back to your system.
- Start the system by pressing the power button.
Now observe if the Dell Inspiron black screen issue has got fixed or not.
Also know: How to Solve Display Driver Failed to Start Error on Windows
Method 2: Try Booting The System in Safe Mode
Booting your PC or laptop in the Safe Mode eliminates the unnecessary functions as the Safe Mode only works in a basic state. Hence, it eventually reduces the chances of various problems and errors to occur. You can also boot your Dell laptop in Safe Mode and troubleshoot the Dell laptop black screen problem. You can use these steps for booting your system in Safe Mode.
- Shut Down the computer if it is on.
- Now, turn it on by pressing the power button.
- Make sure to press the Shift key along with F8 before the system shows the Windows logo. If it doesn’t work in the first attempt, then try it again by following the above steps.
- Now select Troubleshoot.
- Go with Advanced options.
- Then, select Startup Settings.
- In Startup Settings, choose Restart.
- When your Dell laptop restart, it will provide you with multiple options. Select 5 Or F5 to enter the Safe Mode.
Use the Safe Mode and check if it still shows the black screen issue. If the Dell laptop screen goes black but still running in the Safe Mode, then you have to try the other methods that we have mentioned below.
Method 3: Restart explorer.exe Task
When you use your computer, various tasks are running in the background. But, among them, some tasks manage and effects the overall functioning of your PC. explorer.exe is one of them. It is responsible for the taskbar, desktop, and lots of other running processes on your laptop. Hence, sometimes the improper functioning of the explorer.exe task can also result in the Dell laptop black screen with cursor issue. However, you can resolve it by restarting the task with the below-mentioned instructions.
- Access Task Manager. You can do it with the help of Ctrl, Shift, and Esc keys on your keyboard. You have to press them all together.
- Select the Details tab.
- Search for the explorer.exe task.
- Select the task and click End task button.
- After that, reboot the system to check whether the solution worked or not.
Also know: Complete Guide to fix Third Monitor Not Detected Issue on Windows PC
Method 4: Update and Repair BIOS
The black screen issue is directly related to the BIOS. A corrupted or outdated BIOS can cause a lot of troubles on your PC. Hence, if you recently updated the BIOS with a corrupted version, or if you haven’t updated the BIOS with the latest version, you may face the Dell laptop black screen problem. But do not worry, as we have a solution to both the situations. First, let’s check what to do if you have recently updated the BIOS and started facing the issue.
If your BIOS gets corrupted, then you must try resetting it to the default factory version. Here are the necessary steps.
- First of all, restart your Dell laptop.
- Press F2 or F12 key on your keyboard multiple times after seeing the Dell logo on your screen. Press the keys until the system shows Entering Setup.
- Now press the F9 key.
- After that, exit the BIOS by pressing the Esc key.
- Choose Save and Exit.
- Hit the Enter key and exit the BIOS.
- Restart your computer again.
However, if you have not updated the BIOS since a long time ago, then we advise you to update it with the latest version. You can use some BIOS updater program to do so. However, if you want to do it manually, then here are the steps.
- Use the Windows key and R key of your keyboard to open the Run utility.
- Enter msinfo32 in the text box.
- Click Ok.
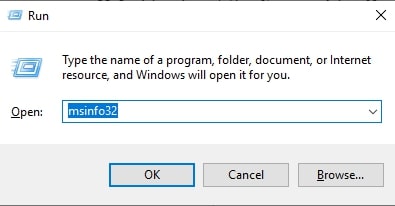
- Note the BIOS Version/Date.

- Visit Dell’s support page.
- Look for an appropriate BIOS update and download it.
- Install the BIOS update.
- Restart the computer and check if the black screen issues still prevail or not.
Method 5:Update and Repair Graphics Driver
Another major reason for the Dell laptop black screen problem is outdated and erroneous graphics drivers. Hence, you have to repair them to get rid of the situation when the Dell laptop won’t boot up due to the black screen issues.
Black Screen on Dell Laptop – Fixed
So, this is how you can get rid of the Dell laptop black screen issues. You can also try reinstalling the appropriate Windows. But, that’s quite a rare solution. Hence, we have not elaborated it above. However, if you want to try it, then you can have a look at one of our previous blogs to install Windows 10 on the PC.