The Dymo Labelwriter 550 is a versatile, high-quality label printer that is commonly used in offices and businesses of all sizes. In order to ensure optimal performance and compatibility, it is important to have the correct driver installed on your Windows PC. It ensures compatibility with your computer’s operating system, fixes any bugs or glitches, and allows for additional features and improvements that may have been added in subsequent updates.
This article will guide you through the process of downloading the Dymo Labelwriter 550 Driver Update, ensuring that you can continue to use your label printer efficiently and effectively. Whether you are a seasoned computer user or a novice, we will provide step-by-step instructions to make the process as simple as possible. So, let’s get started and ensure that your Dymo Labelwriter 550 is running smoothly on your Windows PC!
How to Download and Update the Dymo Labelwriter 550 Driver on Windows PCs
Here are some methods you can use to download and install the Dymo Labelwriter 550 Driver update on your Windows 7, 8, 10, or 11 computer.
Method 1: Using the Official Website
The first and most straightforward method to download the Dymo Labelwriter 550 Driver update is to visit the official Dymo website and download the latest driver specifically designed for the LabelWriter 550. Follow these steps to download and install the driver:
- Open your preferred web browser and visit the official Dymo website (www.dymo.com).
- Navigate to the “Support” or “Downloads” section of the website.
- Locate the Dymo LabelWriter 550 model within the available options and click on it.
- Look for “Drivers & Downloads” or a similar heading and select the appropriate driver for your Windows version (e.g., Windows 10, Windows 8, etc.).
- Click on the driver link to start the download process. Save the file to a location on your PC that you can easily access.
- Once the download completes, locate the downloaded file and double-click on it to initiate the installation process.
- Follow the on-screen instructions provided by the driver installer. It will guide you through the installation steps until the driver is successfully installed on your system.
This is the most commonly used method to download the Dymo LabelWriter 550 driver. However, if you find this method difficult, you can opt for the next method for the Dymo Labelwriter 550 software download.
Also Read: Fixed: HP Printer Driver Not Working in Windows PC
Method 2: Using Device Manager
If you are unable to download the driver from the official website or prefer using alternative methods, you can update the Dymo LabelWriter 550 driver through the Device Manager. Follow the steps below:
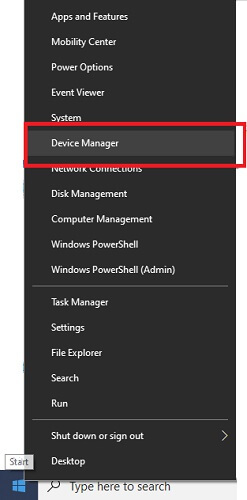
- Press the Win + X keys on your keyboard to open the Power User Menu. From the menu, select “Device Manager.”
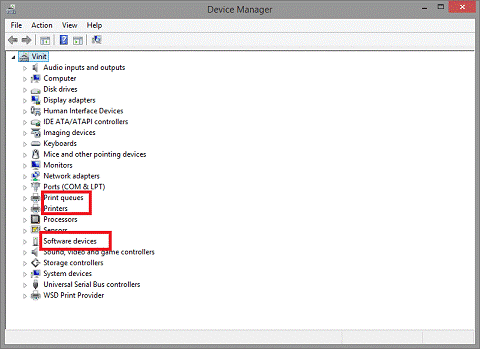
- In the Device Manager window, locate and expand the “Printers” or “Print queues” category.
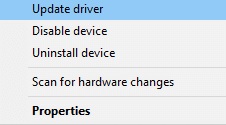
- Right-click on the Dymo LabelWriter 550 printer and select “Update driver” from the context menu.
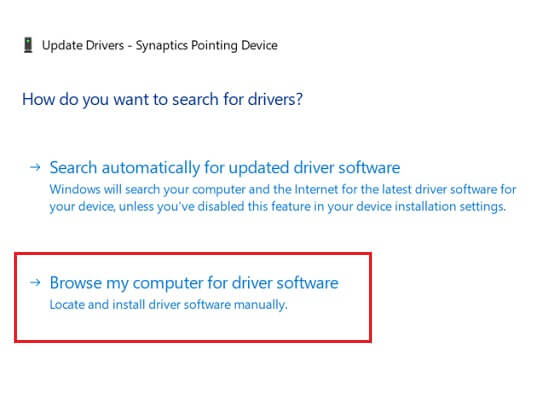
- Choose the option to “Browse my computer for drivers.”
- On the next screen, click “Browse” and navigate to the location where you saved the downloaded driver file (from the official website or any other source).
- Once you have selected the driver file, click “Next” to start the installation process.
- Follow the on-screen prompts to complete the installation. Once finished, the updated driver will be installed, and your Dymo LabelWriter 550 should work smoothly.
This is quite an effective method that can help you with the Dymo Labelwriter 550 Driver download. But if this method does not work out for you, you can proceed to the next method.
Also Read: Fixed: HP Printer Driver Not Working in Windows PC
Method 3: Download Dymo LabelWriter 550 Driver Using Windows Update
Another method to download and update the Dymo LabelWriter 550 driver is by using the Windows Update service. Here’s how to do it:
- Press the Win + I keys to open the Windows Settings menu. From the menu, select “Update & Security.”

- In the Update & Security window, click on the “Windows Update” tab in the left-hand sidebar.
- Click on the “Check for updates” button in the main window. Windows will start searching for updates available for your system.

- If any updates are found related to printers or drivers, click on the “Install” button to begin the installation process.
- Windows will then download and install the updates. It may require a system restart to complete the installation.
If the Windows Update service does not help you download and install the Dymo LabelWriter 550 driver, you can go with the next method.
Method 4: Using Microsoft Catalog
In case the above methods fail, you can manually search for and download the Dymo LabelWriter 550 driver from the Microsoft Update Catalog. Here’s how you can proceed:
- Open your preferred web browser and visit the Microsoft Update Catalog website (www.catalog.update.microsoft.com).
- In the search bar, type “Dymo LabelWriter 550” followed by your Windows version (e.g., Windows 10), and hit Enter.
- Browse through the search results and locate the most recent driver specific to your printer and Windows version.
- Click on the driver link to open the driver details page.
- On the driver details page, click on the “Download” button next to the compatible version.
- Save the driver file to a known location on your PC.
- Open the location where you saved the driver file and double-click on it to begin the installation process.
- Follow the on-screen instructions provided by the driver installer until the driver is successfully installed.
These are some of the most effective methods to download and install the drivers on your computer. However, these methods are manual and require a lot of time and effort. Thus, using the automatic method is a more convenient and easy way to download the driver.
Method 5: Dymo Labelwriter 550 Driver Download Using Microsoft Catalog
Win Riser is one of the most widely used software programs that simplifies the process of updating drivers with a few simple clicks. Moreover, it offers many helpful features to make your computer’s performance smooth. To download and update the Dymo LabelWriter 550 driver on a Windows PC using the Win Riser driver updater tool, you can follow these steps:
- Download and install the Win Riser driver updater tool on your Windows PC using the link provided below.

- Launch the Win Riser driver updater tool from your desktop or the Start menu.
- Once the tool is open, it will automatically start scanning for outdated driver software on your system.
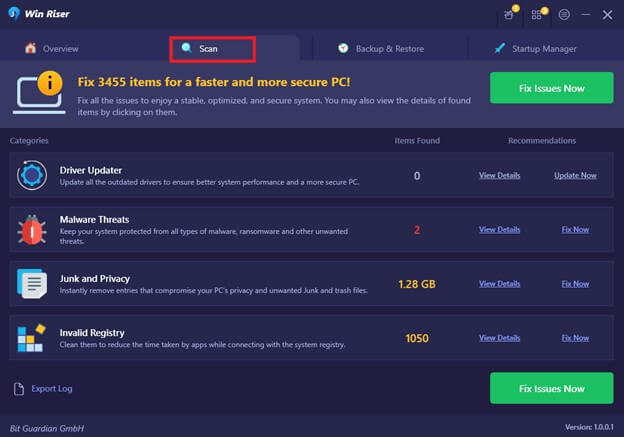
- Wait for the scan to complete, and then scroll through the list of drivers to find the Dymo LabelWriter 550 driver.
- Check the checkbox next to the Dymo LabelWriter 550 driver to select it for updating.
- Click on the “Update” button or a similar option provided by the Win Riser driver updater tool.
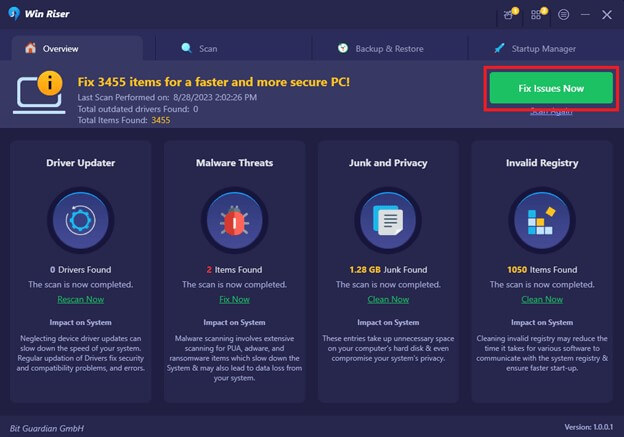
- Wait for the tool to download and install the latest version of the Dymo LabelWriter 550 driver.
- After the driver has been successfully updated, you may need to restart your computer for the changes to take effect.
Note: It is always a good practice to create a backup or restore point before updating any driver software on your Windows PC. This allows you to revert back to the previous driver version if any issues occur.
Successfully Downloaded and Updated Dymo Labelwriter 550 Driver
Downloading and updating the Dymo Labelwriter 550 driver on a Windows PC is a straightforward process that can greatly enhance the performance of the label printer. By following the step-by-step instructions provided in this article, users can ensure that they have the most up-to-date driver for their device. With the updated driver, users can take advantage of the latest features and improvements offered by Dymo, as well as ensure compatibility with their Windows operating system.
Therefore, it is highly recommended to periodically check for driver updates and follow the instructions provided by Dymo to seamlessly download and install the most recent driver for the Dymo Labelwriter 550. Out of these methods, the most effective of them is using the Win Riser application, which will save a lot of time and effort and help you avoid any potential issues or errors that may arise during the printing process.