

Are you tired of dealing with slow internet speeds and unreliable connections on your TP-Link router? Look no further! In this article, we will explore the various methods to download TP-Link drivers for your Windows 10/11 PC, helping you optimize your network performance and ensure a seamless browsing experience.
Having the latest drivers for your TP-Link router is essential, as it allows your PC to communicate effectively with the device, enabling efficient data transfer and stable connections. However, finding and downloading these drivers can sometimes be a daunting task. With our comprehensive guide, you can bid farewell to frustration and say hello to high-speed internet. So, without further ado, let’s dive into the different methods for downloading TP-Link drivers for your Windows 10/11 PC!
How To Download And Install TP-Link Driver for Windows 11/10
In this article, we will explore the various methods for downloading TP-Link drivers on your Windows 10/11 PC, ensuring the smooth and uninterrupted performance of your TP-Link devices.
Method 1: Download And Install the TP-Link Driver From the Manufacturer’s Website
To download and install TP-Link driver through the manufacturer’s website, follow these steps:
- Identify the TP-Link product: Determine the model and version number of your TP-Link device. It could be a router, adapter, or any other networking device.
- Visit the TP-Link website: Open a web browser and go to the TP-Link official website. The website URL is usually www.tp-link.com.
- Navigate to the Support page: Look for a “Support” or “Download” section on the TP-Link website. This section should provide drivers, firmware updates, and other support resources.
- Enter your product details: On the support page, you might be required to enter the model and version number of your TP-Link device. Fill in the form with the correct information and submit it.
- Locate the driver download page: After submitting the product details, you should be directed to a page that displays available drivers for your TP-Link device.
- Choose the correct driver: Identify the driver that matches your operating system (e.g., Windows, macOS, Linux). Additionally, choose the latest version of the driver to ensure compatibility and access to the latest features.
- Download the driver: Click on the download link/button to initiate the driver download process. Save the driver file to a location on your computer where it can be easily accessed.
- Install the driver: Once the driver download is complete, locate the downloaded file and double-click on it to start the installation. Follow the on-screen instructions to complete the installation process.
After successfully installing the TP-Link driver, you should be able to use the TP-Link device with your computer.
Method 2: Download TP-Link Driver From the Device Manager
A built-in Windows utility called Device Manager enables users to oversee and manage installed hardware devices on their PCs. It enables users to view and control hardware devices such as network adapters, sound cards, USB ports, printers, and more. Device Manager provides a convenient way to update, uninstall, or disable device drivers.
Here’s how you can download and install TP-Link driver through Device Manager:
- Plug in the TP-Link device: Connect the TP-Link device (e.g., network adapter) to your computer using the appropriate cable or port.
- Open Device Manager: Press the Windows Key + X on your keyboard, then click on “Device Manager” in the menu that appears. Alternatively, you can search for “Device Manager” in the Windows search bar and open it.
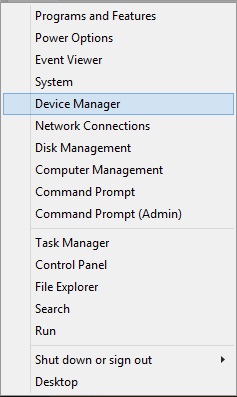
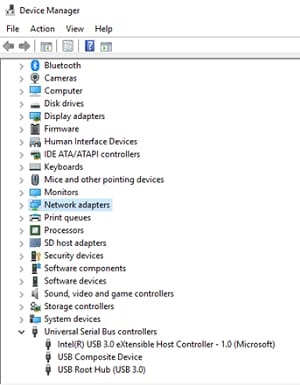
- Locate the TP-Link device: In the Device Manager window, look for the category related to the TP-Link device you want to install the driver for. For example, if you want to install a network adapter driver, expand the “Network adapters” category.
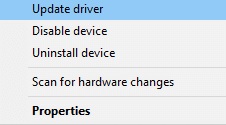
- Right-click on the TP-Link device: Once you have located the TP-Link device, right-click on it and select “Update driver” from the context menu. This will open the “Update Driver Software” window.
- Choose the driver installation method: In the “Update Driver Software” window, select the option “Search automatically for updated driver software”. Windows will then search for and download the appropriate driver for your TP-Link device from the internet.

- Wait for the driver installation: Windows will now search for the latest TP-Link driver and install it on your computer. This process may take a few minutes. Make sure you have a stable internet connection for the driver download.
- Restart your computer: After the driver installation is complete, it is recommended to restart your computer to ensure the changes are applied correctly.
- Verify driver installation: Once your computer restarts, you can verify if the TP-Link driver has been successfully installed. Open the Device Manager again and check if the TP-Link device is listed without any warning icons (yellow triangle or red cross). If there are no warning icons, the driver installation was successful.
That’s it! You have successfully downloaded and installed the TP-Link driver through Device Manager. Device Manager is a useful tool for managing and updating drivers for various hardware devices on your computer.
Method 3: TP-Link Driver Download From the Windows Update
Windows Update is a feature of the Microsoft Windows operating system that allows users to download and install various updates for their computers. These updates can include security patches, bug fixes, performance improvements, and device drivers. Device drivers are software programs that allow your computer’s operating system to communicate with and control hardware devices, such as TP-Link networking devices.
To download and install TP-Link driver through Windows Update, follow these steps:
- Connect your TP-Link device to your computer using a USB cable or make sure it is connected to the same network as your computer.
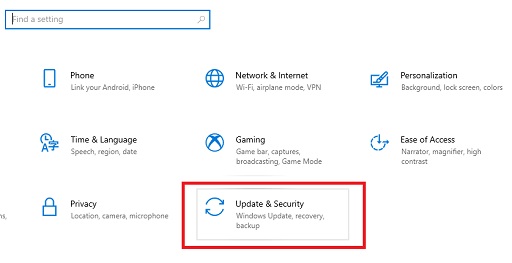
- Open the Start menu and search for “Settings”. Click on the “Settings” app to open it.
- In the Settings window, click on “Update & Security”.
- In the Update & Security window, click on “Windows Update” from the left-hand side menu.
- In the Windows Update window, click on “Check for updates” to initiate the search for available updates.

- Windows will now search for the latest updates for your computer, including device drivers.
- If Windows finds an updated driver for your TP-Link device through Windows Update, it will be listed under the “Optional updates available” section.
- Check the box next to the TP-Link driver update and click on “Download and install” to begin the download and installation process.
- Windows will now download and install the TP-Link driver update. This process may take some time, so be patient.
- Once the installation is complete, Windows will notify you that the TP-Link driver has been successfully updated.
Method 4: Download And Install TP-Link Driver From the Microsoft Catalog
Microsoft Catalog allows users to search for and download drivers for their devices directly from Microsoft. The catalog contains drivers that are digitally signed and verified by Microsoft, ensuring compatibility and security. By downloading drivers through Microsoft Catalog, users can have more confidence in the authenticity and reliability of the files.
To download and install TP-Link Drivers through Microsoft Catalog, follow these steps:
- Connect to the internet and open a web browser.
- Go to the Microsoft Update Catalog website by searching for “Microsoft Update Catalog” in the search engine.
- Once you are on the Microsoft Update Catalog website, you can search for the specific TP-Link driver you need by entering the model number or name in the search bar.
- Browse through the search results and determine the correct driver for your TP-Link device by checking the version number and other details.
- Click on the driver you want to download. A pop-up window will appear, asking you to confirm whether you want to download the driver. Click on “Add” or “Download” to start the download.
- The driver file will be downloaded in the form of a .cab file. Once the download is complete, navigate to the location where the file was saved on your computer.
- Double-click on the .cab file to open it. Inside the .cab file, you will find the driver files necessary for installation.
- Extract the driver files to a desired location on your computer. You can do this by right-clicking on the .cab file and selecting “Extract” or using a file extraction software.
- Once the driver files are extracted, you can proceed with the installation. Right-click on the Windows Start Menu and select “Device Manager” from the list of options.
- In the Device Manager window, find the TP-Link device that needs the driver update. Right-click on it and select “Update driver” from the contextual menu.
- In the next window, select the option to browse your computer for driver software.
- Browse to the location where you extracted the TP-Link driver files and select the appropriate file. Click “Next” to begin the installation.
- Follow the on-screen instructions to complete the installation process. Once the installation is finished, restart your computer if prompted.
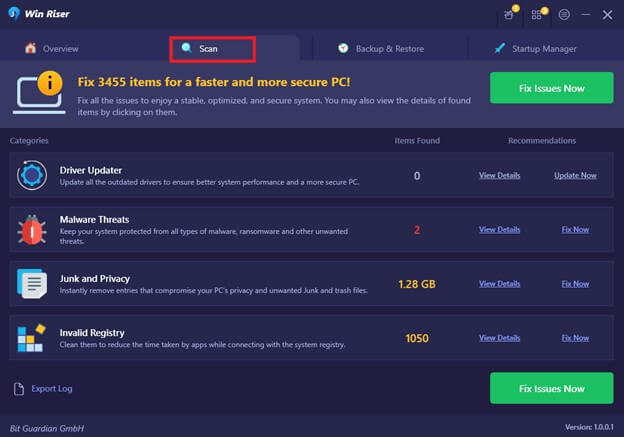
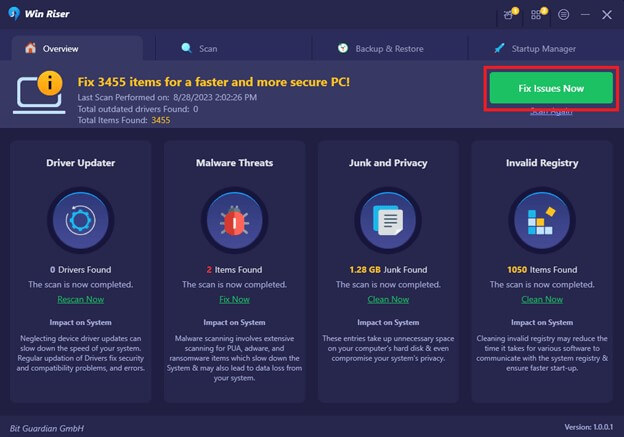
Method 5: Automatic TP-Link Driver Download From the Win Riser Driver Updater
Win Riser Driver Updater is a software utility that helps update and install drivers for various hardware devices on a Windows computer. It scans your system for outdated drivers, downloads the latest versions from the manufacturer’s official website, and installs them automatically.
To use Win Riser Driver Updater to download and install TP-Link drivers, follow the steps below:
- Download and install Win Riser Driver Updater from the given link below:

- Scan for Outdated Drivers: After launching Win Riser Driver Updater, it will automatically scan your computer for outdated drivers. This may take a few minutes, depending on the speed of your system and the number of installed devices.
- View the Scan Results: Once the scan is complete, Win Riser Driver Updater will display a list of outdated drivers. Locate the TP-Link driver in the list and select it. You can also choose to update all drivers by clicking on the “Select All” option.
- Download and Install TP-Link Driver: After selecting the TP-Link driver, click on the “Update” or “Download” button to initiate the download process. The software will connect to the official TP-Link website and download the latest version of the driver.
- Install the TP-Link Driver: Once the download is complete, Win Riser Driver Updater will automatically install the TP-Link driver. During the installation, you may be prompted to accept the terms and conditions or provide permission for the installation to proceed. Follow the prompts and allow the installation to complete.
- Restart Your Computer: After the TP-Link driver installation is complete, it is recommended to restart your computer to ensure the changes take effect.
Win Riser Driver Updater simplifies the process of updating and installing drivers by automating the download and installation tasks. It eliminates the need to manually search for drivers on the manufacturer’s website, minimizing the risk of downloading incorrect or outdated drivers. Overall, it serves as a convenient and reliable tool for maintaining an updated driver library on your Windows system.
Download And Install TP-Link Driver For Windows 11/10: Successful
Downloading the TP-Link driver for your Windows 10/11 PC is a crucial step to ensuring optimal performance and compatibility with your TP-Link devices. By following the various methods outlined in this article, you can easily obtain the necessary drivers and keep them up to date.
Whether through the official TP-Link website, the Windows Device Manager, or using a reliable Win Riser driver updater, each method provides a viable solution to download and install TP-Link drivers.