

In today’s modern world, technology has become an integral part of our daily lives. We rely on it for various purposes, from entertainment to work. One of the most common devices we use for these activities is our Windows PC, which often connects to external displays using an HDMI cable. However, it can be incredibly frustrating when we encounter the dreaded “HDMI No Signal” error message.
This error can occur for a multitude of reasons, such as a faulty cable, incorrect display settings, or outdated graphics drivers. Fortunately, there are several methods you can try to fix the HDMI No Signal error on your Windows PC. In this article, we will explore 5 effective ways to tackle this problem and get your display up and running smoothly again.
4 Ways to Fix HDMI No Signal Error
There are several methods you can try to get rid of this error and restore your HDMI connection. In this article, we will explore five effective ways to fix the HDMI no signal error in Windows PCs and provide a detailed understanding of how each method works.
1. Check physical connections:
The first step towards troubleshooting the HDMI no signal error is to check the physical connections. Ensure that both ends of the HDMI cable are securely plugged into the HDMI ports of your PC and the display device. If the cable is loose or damaged, it may not be able to establish a proper connection, leading to a no-signal error. Additionally, you can try connecting the HDMI cable to a different port on your PC or using a different cable altogether to rule out any potential hardware issues.
2. Update graphics drivers:
Outdated or incompatible graphics drivers can often cause HDMI connectivity issues. To resolve this, you need to update your graphics drivers. To do so, follow these steps:
- Press the Windows key + X and select “Device Manager” from the menu.
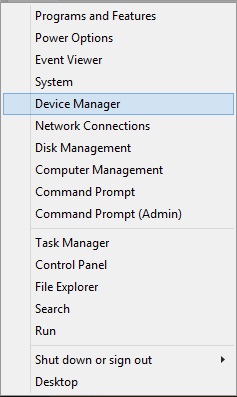
- Expand the “Display adapters” category.

- Right-click on your graphics card and select “Update driver.”
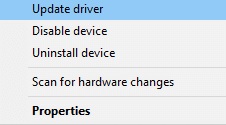
- Select the option to automatically search for updated driver software.

- If Windows finds an updated driver, adhere to the instructions displayed on the screen.
You can also update the graphic driver using the Win Riser Driver Updater software. Follow the steps below to proceed:
- Click the following link to download and install Win Riser Driver Updater.

- Launch the Win Riser Driver Updater tool by clicking on its desktop icon or searching for it in the Start menu.
- Once the tool is open, it will automatically scan your system for outdated or missing drivers, including graphics drivers.
- After the scan is complete, you will see a list of drivers that need to be updated. Look for the graphics drivers in the list.
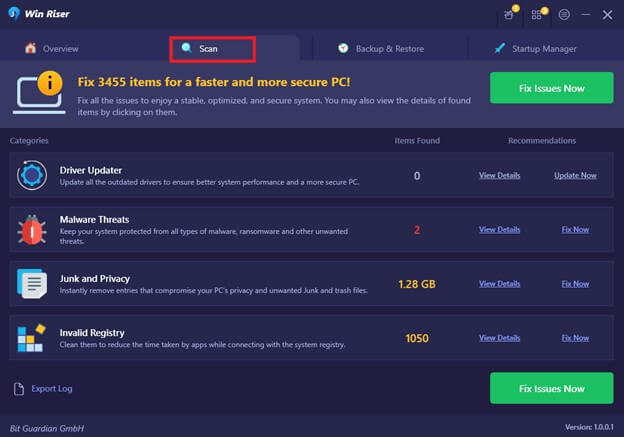
- You can sort the drivers by category or search for specific graphics drivers using the search bar provided.
- Once you have located the graphics drivers you wish to update, click on the “Update” or “Download” button next to it.
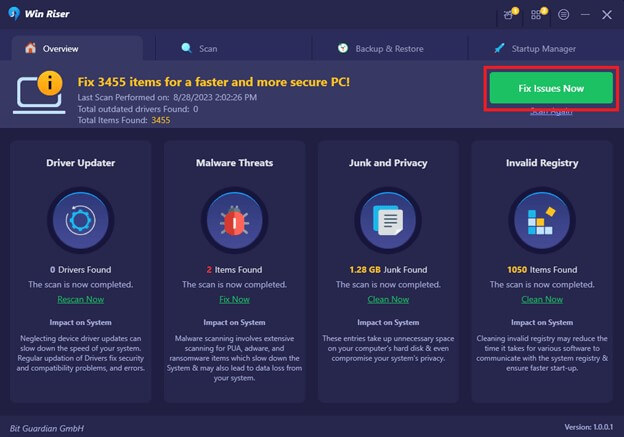
- The Win Riser Driver Updater tool will then download the latest version of the graphics driver from the official manufacturer’s website.
- Depending on the size of the driver file and your internet connection speed, the download may take a few minutes.
- After the download is complete, the tool will automatically install the graphics driver on your system. You may need to grant administrative permissions for the installation to proceed.
- Once the installation is done, restart your computer to apply the changes.
- After the restart, you can verify if the graphics drivers have been successfully updated by checking the version number in the device manager or the graphics settings of your computer.
By updating your graphics drivers, you can ensure that your PC communicates effectively with the display device, preventing the HDMI no signal error.
Also know: No DP Signal From Your Device Dell Monitor (Fixed)
3. Adjust screen resolution and refresh rate:
Sometimes, the HDMI no signal error occurs due to incompatible screen resolutions or refresh rates. To fix this, you can manually adjust these settings to match the capabilities of your display device. Follow these steps:
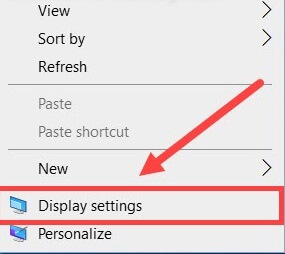
- Right-click anywhere on the desktop and select “Display settings” from the menu.
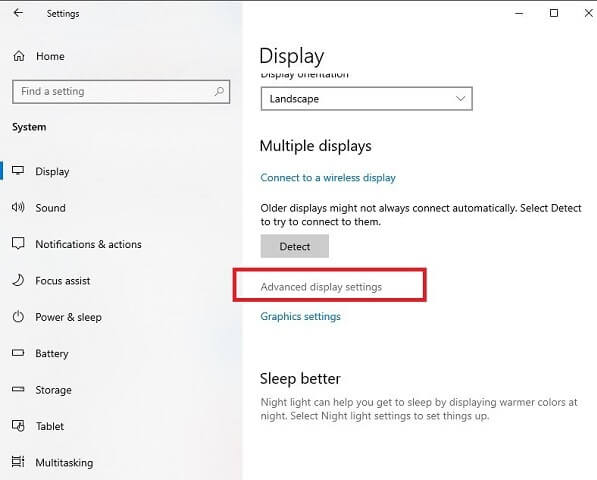
- Under the “Display” tab, scroll down and click on “Advanced display settings.”
- Click on “Display adapter properties for Display 1” (or a similar name).
- Navigate to the “Monitor” tab and select the appropriate refresh rate from the drop-down menu.
- Go back to the “Display” tab and click on “Resolution.” Choose the recommended resolution for your display device.
- Click “Apply” and then “OK” to save the changes.
By setting the correct screen resolution and refresh rate, you can establish a stable HDMI connection, resolving the no signal error.
4. Perform a system restore:
If none of the above methods work, you can try performing a system restore to revert your PC’s settings to a previous point in time when HDMI connectivity was working fine. To perform a system restore, follow these steps:
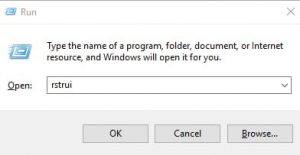
- Press the Windows key + R and type “rstrui” in the Run dialog box. Press Enter.
- Click on “Next” in the System Restore window.
- Select a restore point that predates the occurrence of the HDMI no signal error.
- Follow the on-screen instructions to complete the system restore process.
Please note that performing a system restore will revert your PC’s settings, and any recently installed software or updates may get removed. Therefore, it’s crucial to back up your important files before proceeding with this method.
Also know: Complete Guide to fix Third Monitor Not Detected Issue on Windows PC
HDMI No Signal Error in Windows PC: Fixed
Dealing with the HDMI no signal error on your Windows PC can be frustrating, but it doesn’t have to be a headache. By following the five methods outlined in this article, you can easily troubleshoot and fix the issue, ensuring that you can enjoy a seamless connection between your PC and your HDMI device. Remember, always start with the basics, checking your connections and ensuring that all cables are properly plugged in.
If that doesn’t solve the problem, try updating your graphics card driver or rolling back to a previous version if needed. Adjusting the screen resolution and refreshing the HDMI port can also make a significant difference. Furthermore, it’s important to keep your operating system and drivers up to date, as outdated software can often lead to compatibility issues. So don’t let technical difficulties stand in your way; take control and make the most of your HDMI connection today!