
If the Logitech G Pro X microphone is not working, then it is certainly a cause for worry. However, you need not panic, as this post shares quick and easy fixes to solve this problem.
The Logitech devices are almost every gamer’s delight. The company offers a peripheral for every need that a gaming enthusiast may have. For instance, they are incredible mice and keyboards available in the marketplace exclusively for gamers. G Pro X microphone is also a part of the gaming series of Logitech devices. It is a headset that makes the games even more thrilling with its Blue Voice Technology to help you hear the game sounds clearly. However, recently many users have complained that the Logitech G Pro X microphone is not working.
We have investigated the reasons for the same. And found some quick and easy fixes for this issue. This article shares the same. Let’s begin by understanding why the Logitech G Pro gaming headset mic is not working. However, if you are only interested in knowing the solutions to the problem, then below is a glimpse of the most recommended fix.
Fixes for the Logitech X Pro Mic is not Working Issue
Below are the workarounds that you can try to make things all right in no time if the Logitech X Pro mic is not working.
Fix 1: Ensure there is no Physical Damage
Before moving on to the other solutions, first, you should ensure that the headset is not physically damaged. Thus, if the Logitech G Pro X microphone is not working, then connect it to another computer. If it works fine on the other computer, then move to the other fixes. If it does not work even on the other PC, then you need to contact Logitech for fixing the problem.
Fix 2: Unmute the Microphone
You can certainly not hear any sound from a muted headset. Thus, if the Logitech G Pro X headset mic is not working, then make sure that the mute is not turned on. Follow these instructions to do it.
- Click on the speaker icon.
- Now, click on the mute toggle if it is turned on to turn it off.
Also know: How to Download & Update Logitech Drivers
Fix 3: Turn on Access
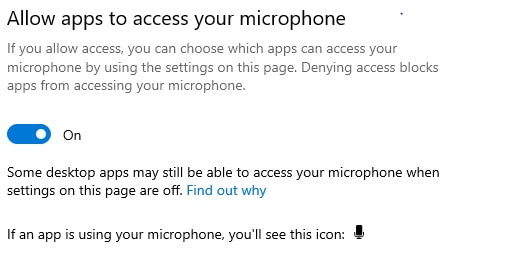
Sometimes, it may happen that you have not allowed apps access to the microphone. And this may be the reason why your Logitech G Pro X microphone is not working. Therefore, turn on the access by following the instructions given below.
- In the search box, input “Microphone Privacy” and select “Microphone privacy settings” from the results.
- Click on the “Change” option and then turn on the “Microphone access for this device” toggle.
- Turn on the “Allow apps to access your microphone” toggle.
- Now, scroll down and turn on the “Allow desktop apps to access your microphone” toggle.
If your Logitech Pro X microphone is not working even after allowing apps to access it, then you need to try the next fixes.
Fix 4: Enable the Microphone
One reason why your Logitech G Pro X headset mic is not working may be that you have not enabled it. Therefore, follow these steps to enable the microphone and solve the problem.
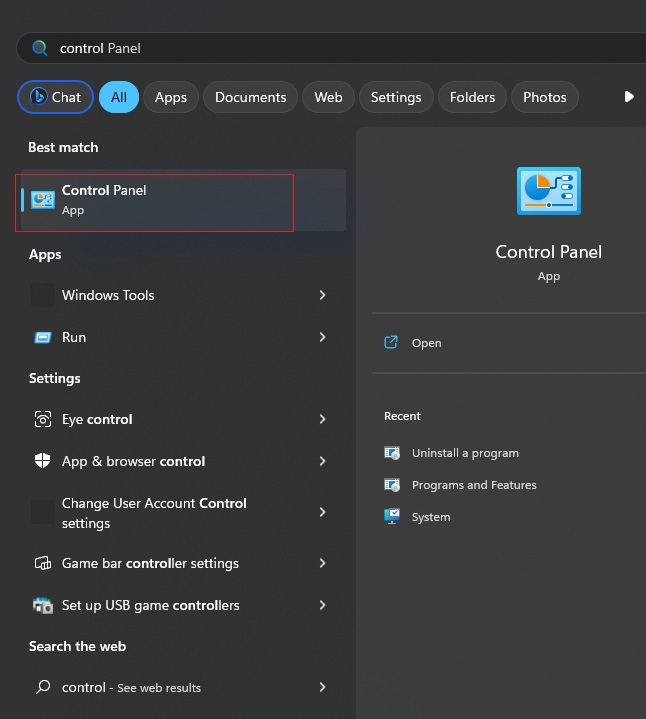
- In the search box, input “Control Panel” and select the same from the results.
- Click on “View by” and select “Small icons” from the drop-down menu.
- Select “Sound” from the options that you get on the screen.

- Go to the “Recording” tab.
- Right-click on the Logitech G Pro X microphone and select “Enable” from the context menu.
Also know: How to Resolve Microphone Not Working on Windows 10
Fix 5: Update the Audio Driver (Recommended)
Do you often face problems with the sound on your computer or your microphone does not work the way you want? If yes, then it is the drivers that need your attention. Outdated audio drivers are the main reason for almost all the sound-related issues that trouble you. Therefore, update the driver as soon as possible to drive problems such as the Logitech G Pro X microphone not working. You can update the driver in various ways such as through Device Manager, the peripheral manufacturer’s website, etc. However, here we shall discuss the method preferred by tech experts across the globe.
Updating drivers automatically is what almost everyone prefers to do. Automatic driver updates save you time, energy, and effort. You can update the drivers automatically by using Bit Driver Updater. It is the best automatic driver updater that makes the performance of your computer a whole lot better, along with letting you update the drivers in an instant. It also offers a plethora of incredible features that we will discuss a little later. First, let’s understand how to use it.
How to use Bit Driver Updater?
- Click on the download button given below to download and install Bit Driver Updater.
- Wait till the automatic scan finishes (it only takes one or two seconds).
- Go through the scan results and click the “Update Now” button present next to the driver that is causing a problem. If you want to update all the problematic drivers in one shot, then select “Update All.”
An implementation of the above three steps is all that it takes to keep the drivers up to date. Bit Driver Updater is this simple to use. Moreover, it also boasts many outstanding features. We discuss them below.
Remarkable features and benefits of Bit Driver Updater
- It reduces the startup time of your computer by 50%.
- With this software, you can schedule the driver scans as per your convenience.
- It allows you to create and restore driver backups.
- You can accelerate the speed at the driver update downloads.
- If you do not want to update any driver, then you can add it to the Ignore list.
- It resolves various annoying errors and makes the computer fast.
- Bit Driver Updater is available in multiple languages and for all the latest Windows versions.
- The driver database of this software is gigantic.
The list of features and benefits of Bit Driver Updater does not end here. You will come to know many of its advantages after you use it. Hence, click on the link shared here to download and install it on your computer.
Outdated drivers are often a reason for your Logitech G Pro X headset mic throwing tantrums. However, the same is not always the case. Sometimes, the microphone may not be working properly because of other reasons such as incorrect settings, etc. In such a case, jump to the below solutions.
Fix 6: Check the Audio Settings
If the sound settings are incorrect, then certainly the Logitech pro x mic will not be working. Therefore, check and correct the settings by following the directions given below.
- Open “Control Panel.”
- View by small icons and select “Sound” from the available options.
- Go to the “Recording” tab, click on the Logitech G Pro X microphone, and then click on the “Set Default” button located at the bottom.
- Now, right-click on the microphone and choose “Properties” from the context menu.
- Go to the “Levels” tab, set the volume to maximum, and click on “OK.”
Tweaked the microphone settings, but still, the Logitech G X Pro mic refuses to work. Then, maybe the culprit is certain hardware issues. Let’s learn how to fix them, so the headset can start working again.
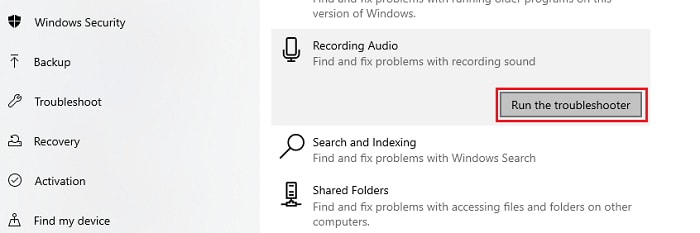
Fix 7: Perform Hardware Troubleshooting
You can use the in-built Windows troubleshooter to fix the Logitech G Pro microphone if it is not working. Follow the steps shared below to do it.
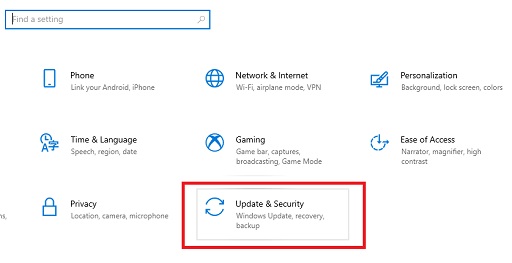
- Use the “Windows + I” keyboard command to navigate to Settings.
- Click on the Update & Security setting.
- Click on the “Troubleshoot” option.
- Click on the “Recording Audio.”
- Select the option to “Run the troubleshooter.”
Now check whether the Logitech Pro X microphone is working or not. If it fails to work, then below is the last resort.
Also know: How to Fix Logitech G933 Keeps Disconnecting & Reconnecting Issue
Fix 8: Reinstall G Hub
Reinstalling G Hub is the last option you have if your Logitech Pro X headset mic is not working or is not functioning properly. We suggest you try this solution at last because it is a bit time-consuming. We share the steps to do it below.
- Employ the “ Windows+X” keyboard command to evoke the Quick Access menu.
- Choose “Apps and Features” from the available options.

- Click on Logitech G Hub and select the “Uninstall” option.
- Complete the uninstallation.
- After the uninstallation is done, restart your computer.
- Now, go to the download page of Logitech G Hub and select “Download for Windows.”
- After the download is complete, click on the downloaded file and follow the on-screen instructions to install Logitech G Hub.
- Connect your Logitech G Pro X headset mic and make sure that it does not show any errors while working.
In case you have any doubts or questions, go through the next section to find the answers you are looking for.
Frequently Asked Questions
Q1. Why is the Logitech G Pro X microphone not working?
Below are the key reasons why the microphone is causing you trouble.
- The audio driver is out of date.
- You have not turned on the access for the microphone.
- The headset is muted.
- You have not set the microphone as default.
- Incorrect audio settings.
Q2. How do I test my microphone in Windows 10?
If you wish to test your Logitech G Pro X microphone to know whether it is working correctly or not, follow these steps.
- Connect the microphone to your computer.
- Open “Settings.”
- Select “System.”
- Choose the “Sound” option.
- Navigate to “Input” and choose “Test your microphone.”
- Speak something into the microphone.
You can also refer to our detailed post on how to check your microphone to do it effortlessly.
Logitech G Pro X Microphone Not Working: Fixed
Through this article, we helped our readers solve the Logitech G Pro X microphone not working problem. We have provided a number of ways to solve the issue. However, in our view, the best way to solve this and all other issues is to update drivers with Bit Driver Updater. If you know about any other better methods to troubleshoot the problem, then use the comment box to enlighten us. If you think our post was worth your time and attention, then keep reading our blog for more such information