If you have a Logitech webcam, then it is crucial that you download, install and update the Logitech webcam drivers. Hence, read on to know how to do it with ease.
Nowadays, as remote working, online classes, and virtual meetings are quite trending, webcams have become even more essential. There are a plethora of manufacturers of computer cameras. However, Logitech is among the most popular names. If you have also got a webcam from this manufacturer, then to make it work smoothly, first, you need to download the Logitech webcam driver.
For the uninitiated, the driver helps the webcam communicate with your computer effectively. Without a properly installed Logitech webcam driver, the peripheral can’t deliver the performance that you want.
Merely downloading and installing the driver is not all that needs to be done. You must also update the driver for your Logitech webcam timely to ensure that its performance remains glitch-free and smooth.
Hence, through this article, we walk you through how to download the Logitech webcam driver for Windows 10/8/7, install, and update it easily and quickly.
Methods to Download, Install and Update Logitech Webcam Driver
Below are the ways through which you can download the Logitech webcam driver, install, and update it.
Method 1: Get the Driver from Logitech’s Website
The official website of Logitech has all the drivers that you need for the devices manufactured by the company. You can identify the compatible Logitech webcam driver, download, and install it from the website.
Follow the below steps to do it.
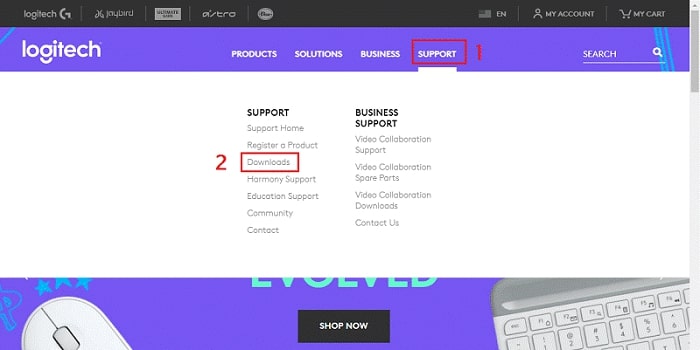
- Go to the Logitech website from here.
- Click on the SUPPORT tab.
- Select Downloads from the drop-down menu.
- Scroll down to the FIND YOUR PRODUCT section and click on WEBCAMS AND CAMERA SYSTEMS.

- Use the search box to find your webcam or select it from the Webcams and Camera Systems that are displayed on the screen.
Note: Check the end of your Logitech camera USB cable to find the required information about the webcam, such as its P/N, M/N, PID, and product name. - After the webcam setup window appears, select Downloads from the left pane.

- Click on the Download Now button to download the required driver setup file.
- Click on the downloaded driver setup and follow the on-screen directions to install the Logitech webcam driver.
Method 2: Take help from Device Manager
Another way to download, install, and update the Logitech webcam driver is through Device Manager. Below is how to get the needed drivers with the help of this in-built Windows tool.
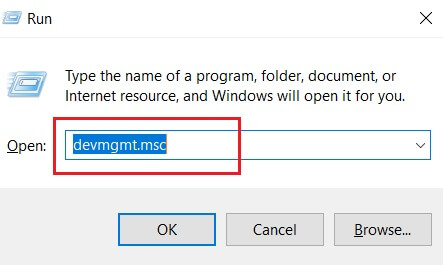
- Employ the keyboard shortcut Windows + R to bring up the Run box.
- Type the command to activate Device Manager, i.e., devmgmt.msc in the Run box and click on OK.
- After the Device Manager gets activated, click on the Imaging Devices segment.
- Right-click on the Logitech webcam and choose Update driver.
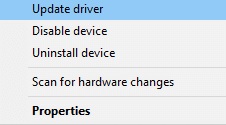
- Select the option to Search automatically for updated driver software.

- Wait till the Device Manager finds the updated Logitech webcam driver for Windows 10/8/7, downloads, and installs the same.
- Restart the computer after this process is complete.
Also know: How to Fix Logitech C920 Webcam Not Working on Windows PC
Method 3: Get the Logitech Webcam Drivers Automatically (Recommended)
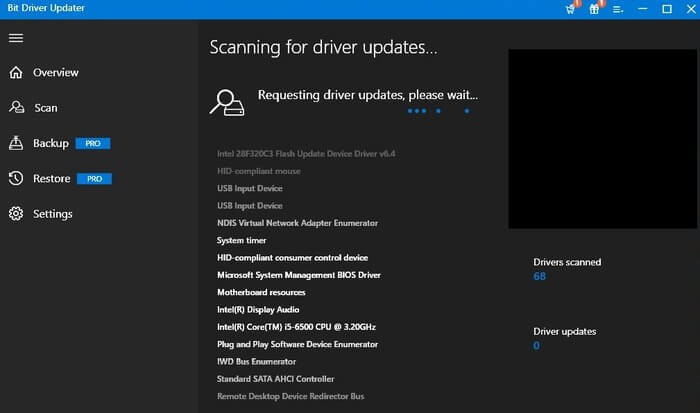
The manual methods to download the Logitech webcam driver, install, and update it need a considerable amount of time and effort on your part. Therefore, we recommend you perform an automatic driver download, installation, and update with the best driver update tools, such as Bit Driver Updater.
Bit Driver Updater is a software that lets you download, install, and update the drivers for all the peripherals, including the Logitech webcam automatically with a single click. Moreover, it boasts several features, such as driver backup and restores, download speed acceleration, creation of a restore point, driver Ignore list, and more to make it quicker and easier to update the drivers. Below is how to use this program.
- Download and install Bit Driver Updater from the below link.

- Wait till the software scans your computer (the automatic scan takes only a few seconds).
- Click on the Update Now option presents alongside the Logitech webcam driver to download, install and update it.
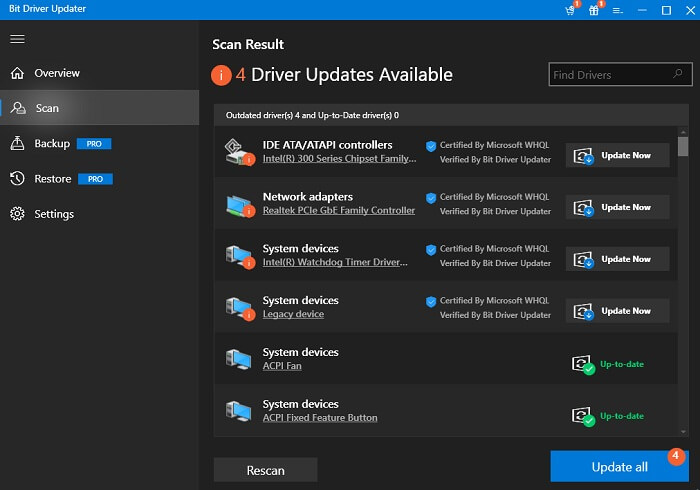
If you want to download and install the updated versions of all the outdated drivers existing on your computer automatically in one click, then choose Update All.
Method 4: Perform an operating system update
Updating your OS is also one of the ways to download, install and update the Logitech camera driver on Windows 10/8/7. Thus, below are the steps to update the operating system.
- Make use of the Windows + I keyboard shortcut to evoke the Settings.
- Now, click on the Update & Security option.
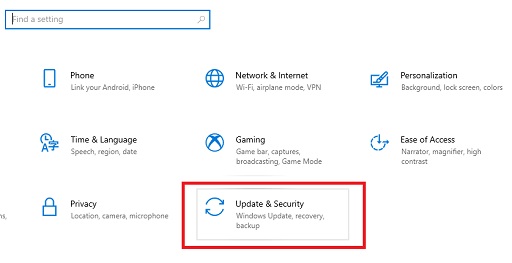
- Select Windows Update and then choose the option to Check for updates.

- Download and install the updated version of your OS by clicking on the Download button.
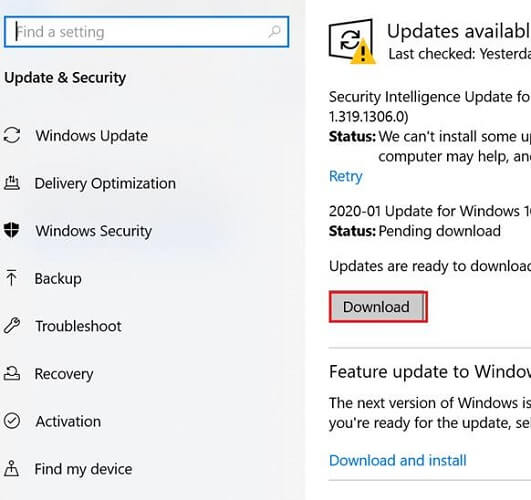
- Reboot your PC after the process completes.
These were the methods to download, install and update the driver for the Logitech webcam. Now, the next section of this tutorial answers a few questions that our readers have often asked about the Logitech cameras.
Frequently asked questions
Q1. How do I set up the Logitech webcam on Windows 10?
Installing the Logitech webcam is not a tough process. You only need to follow the below steps to do it.
- Download Logitech webcam software for Windows 10/8/7 and the webcam driver.
- Use a USB cable to connect the webcam to your PC.
- Wait till Windows recognizes your webcam.
Q2. How do I update my Logitech webcam driver?
Through this article, we have discussed quite a lot of ways to download, install, and update the drivers for your Logitech webcam. You can do it via Logitech’s website, Device Manager, Windows update, or automatically with Bit Driver Updater.
Q3. How do I download the Logitech webcam software?
To download the Logitech webcam software on your Windows 10/8/7 computer, follow these steps.
- Go to the Logitech website.
- Click on “SUPPORT” and select “Downloads.”
- Search for your webcam.
- Click on your webcam model.
- Now, select the “Downloads” option from the left pane.
- Click on “Download Now” to get the software for your Logitech webcam.
- Follow the on-screen instructions to install the software.
Logitech Webcam Driver Downloaded, Installed, and Updated Successfully
This article explained how to download, install and update the Logitech webcam driver quickly and effectively. In our view, the methods shared here are the best ones to accomplish the task with ease. However, if you know about any more ways to do it, then you can also share your knowledge with us through the comment box.